Configuration examples
Worked configuration examples for the Canistracci OIL tenant, based on common MiRTA PBX deployment patterns and configuration guide scenarios.
- Read a number from the caller and run an AGI script using it as parameter
- Change the CallerID of the extension when dialing out
- Select the destination for DID based on the BLF selected on the phone
- Receiving SMS and routing to an email
- Configuring TWILIO SMS provider
- Collect feedback from clients calling support
- Using a BLF key to monitor and pause/unpause from a queue
- Using a BLF key to monitor FMFM for an extension and toggle it with the key press
- Using a SIP loudspeaker device
- Ask for the virtual extension to join and join the calling extension to it
- Play the agent name to the caller
- Create a "press 1" campaign
- Play a message to the called number, when answer
- Create a forwarding from an extension using a feature code
- Enable, disable, set and check a forwarding for a DID
- Mask/Withhold callerid when dialing out using a prefix
- Create a Night/Day switch with automatic toggle
- Visual Voicemail
- How to secure the server and prevent/limit frauds?
- Configure a remote PBX as part of the extension list
- Understanding DID, Queue and Extensions recordings
- Configuring and using Ademco alarm receiver
- Using Dial by Name Directory
- Configuring Lenny chatbox
- Using different MOH for queues
- Blocking a port using the Custom Rules
- Setting a notification for Emergency Numbers - Kari's Law
- Configuring custom conversion string for Microsoft Azure TTS
- Understanding autorefills and autocharges
- Queue priorities and penalties
- Using the web phone
- Using tenant variables to manage load balancing
- Configuring Text to Speech and Speech to Text using Google Cloud
- Configuring Recording Storage using Google (Cloud Storage with a Service Account or Google Drive with a Personal Account)
- Configuring a service using ChatGPT
- Configuring push notification
- Token authentication
Read a number from the caller and run an AGI script using it as parameter
This example is written for the Canistracci OIL tenant. Create the objects with a Docs Demo prefix, test them on non-production numbers, and then adapt the same structure for the production tenant.
Let's make the example of a service to verify if a code provided by the user is valid or not, by checking in a database.
As first step we'll create a media file to ask to the user the number.
400px
Then we'll create a "Custom Destination" to read the number from the user
400px
Let's define an AGI script to test if the code is good or not. We'll send the number entered as parameter. As an additional parameter, we'll send the callerid number of the caller
400px
Then we can create the custom destination to use the AGI script defined. As first parameter we'll use the variable holding the code entered ${USR-usercode} and as second parameter the callerid of the caller.
400px
The AGI script in this case will set the variable AGIRESULT to TRUE/FALSE, so this value can be evaluated in a condition

Validation
- Confirm the tenant selected in the top bar is Canistracci OIL before creating the example.
- Verify the created objects appear in the expected Configuration menu page.
- Place a controlled test call or run the related status check.
- Remove or disable temporary test numbers when the example is no longer needed.
Change the CallerID of the extension when dialing out
This example is written for the Canistracci OIL tenant. Create the objects with a Docs Demo prefix, test them on non-production numbers, and then adapt the same structure for the production tenant.
You may have the need to call out using different CallerID, some of them may be not even defined in the system. There are multiple ways to do it, let's review them:
Use CallerID regex
If you have some "rules" for choosing the CallerID, you may use the CallerID regex located in the DIDs screen
400px
and then associate the Outbound CallerID regex created to your extension. This way you can use an Italian CallerID number when dialing a number starting for 39 or use an American number when dialing a number starting for 1
Use Forward To custom destination with a feature code
You can start by creating a custom destination "Forward To" setting the forward number to the special variable ${PARAM1} and picking up or editing the CallerID for each one of your custom CallerID
400px
Then you'll create a different feature code for each one of your custom destinations
400px
Use a feature code
You can easily create a feature code for each of your custom CallerID. Start by creating a Custom Destination, type "Alter CallerID number" for each one of your custom CallerID
400px
then create a Dial As feature code to just dial out with the dialed number
400px
and then define a feature code to dial out by using them
400px
Read the CallerID from the client
You can do even a further customization, having the system asks for the CallerID to be used for the call and the number to dial.
400px
400px
400px
Then mix all together in a feature code
400px

Validation
- Confirm the tenant selected in the top bar is Canistracci OIL before creating the example.
- Verify the created objects appear in the expected Configuration menu page.
- Place a controlled test call or run the related status check.
- Remove or disable temporary test numbers when the example is no longer needed.
Select the destination for DID based on the BLF selected on the phone
This example is written for the Canistracci OIL tenant. Create the objects with a Docs Demo prefix, test them on non-production numbers, and then adapt the same structure for the production tenant.
The client want to manually select one of three optional destinations for his DID. Option 1 will be Voicemail 1000 (weekend), option 2 will be Voicemail 2000 (handmatig) and option 3 will be a weektime condition.
I start by creating three Flows, named 10000, 20000 and 30000 monitoring the relative extension.
After creating the three Flows, I create a series of Custom Destination "Set Extension in use" and "Set Extension not in use" to set each of the three flows in use and not in use
400px
400px
400px
When each flow is activated, it set his associated extension to IN USE and move all other to NOT IN USE
The Custom destinations are configured as following:
400px
Now it is time to define a condition for each of the flow, if the flow extension is IN USE, the destination will be followed, like as following:
400px
The DID will just list all the condition, one after the other
400px
On the phone, the BLF will be configured as following (Yealink)
400px
Validation
- Confirm the tenant selected in the top bar is Canistracci OIL before creating the example.
- Verify the created objects appear in the expected Configuration menu page.
- Place a controlled test call or run the related status check.
- Remove or disable temporary test numbers when the example is no longer needed.
Receiving SMS and routing to an email
This example is written for the Canistracci OIL tenant. Create the objects with a Docs Demo prefix, test them on non-production numbers, and then adapt the same structure for the production tenant.
There are two ways to receive SMS. You can receive them as SIP MESSAGE, or you can have them delivered from your provider using an API.
SIP MESSAGE
As first step, please check if your system can receive messages using SIP protocol. In sip.conf check if you have the following rows:
accept_outofcall_message=yes
outofcall_message_context=astsms
auth_message_requests = yes
Add if not, then add this to the [general] section of sip.conf and reload the sip module
In your DID, configure the protocol SIP MESSAGE and its destinations
400px
Custom API
In your SMS Provider, configure the URL https://.../pbx/the related application page
400px
So when your provider needs to deliver you a SMS, it will call your URL and provide all data.
In your DID you need to configure which fields are mapped with each info:
400px
If you provider is twilio, you can use their protocol, in this case the fields are already mapped and there is no other need.
400px

Validation
- Confirm the tenant selected in the top bar is Canistracci OIL before creating the example.
- Verify the created objects appear in the expected Configuration menu page.
- Place a controlled test call or run the related status check.
- Remove or disable temporary test numbers when the example is no longer needed.
Configuring TWILIO SMS provider
This example is written for the Canistracci OIL tenant. Create the objects with a Docs Demo prefix, test them on non-production numbers, and then adapt the same structure for the production tenant.
Twilio has announced a new API to deliver SMS, but the old RESTful simple API is still working. We are going to use it. Configure a new Provider, type SMS with protocol WEB URL.
400px
Use the following link:
https://api.twilio.com/2010-04-01/Accounts/<ACCOUNT SID>/Messages.json
Replacing <ACCOUNT SID> with your Twilio Account SID
400px
Complete the configuration with the Auth Token and the Post Data like:
To=${URIENCODE(${SMSDESTNUM})}&From=${URIENCODE(+18584334434)}&Body=${URIENCODE(${SMSTEXT})}
400px
Once created the provider, create the Routing Profile, type SMS and define the rules, for example as following
400px
If you want to send a MMS, use:
To=${URIENCODE(${SMSDESTNUM})}&From=${URIENCODE(${SMSSOURCENUM})}&Body=${URIENCODE(${SMSTEXT})}&MediaUrl=http://<your server>/pbx/mms/${MMSKEY}/${MMSFILENAME}
Receiving SMS
To receive SMS with Twilio, the best is to use the Custom format in POST/GET. Twilio seems to have problems in delivering messages over https when using a LetsEncrypt certificate. Not a smart move from them. This will force you to use HTTP as protocol. Beware, if using LetsEncrypt certificate, you may have a redirect forcing all communications to go over HTTPS. You need to disable it in /etc/httpd/conf/httpd.conf.
400px
Validation
- Confirm the tenant selected in the top bar is Canistracci OIL before creating the example.
- Verify the created objects appear in the expected Configuration menu page.
- Place a controlled test call or run the related status check.
- Remove or disable temporary test numbers when the example is no longer needed.
Collect feedback from clients calling support
This example is written for the Canistracci OIL tenant. Create the objects with a Docs Demo prefix, test them on non-production numbers, and then adapt the same structure for the production tenant.
It is now simple and easy to collect a feedback from a call, like a call to a support group. It can be done for calls going to Hunt Groups or to Queues.
Start by creating your queue, in the normal way.
400px
Proceed in creating the feedback collector, using an IVR with some response values. In this case just from 1 to 5.
400px
Arrange all together by using the Special Destination "Continue execution when called party hangup"
400px
The outcome of the IVR/Feedback/Poll, can be easily seen in the Stats/IVR
400px
If you like to measure the performance for each agent, you need to create an IVR for each agent and then select it using a condition. The condition needs to check the system variable MEMBERNAME. Unfortunately, by design (bad design) it is not possible to query a system variable directly, so you need to first assign the system variable to an USR variable and then test it.

Validation
- Confirm the tenant selected in the top bar is Canistracci OIL before creating the example.
- Verify the created objects appear in the expected Configuration menu page.
- Place a controlled test call or run the related status check.
- Remove or disable temporary test numbers when the example is no longer needed.
Using a BLF key to monitor and pause/unpause from a queue
This example is written for the Canistracci OIL tenant. Create the objects with a Docs Demo prefix, test them on non-production numbers, and then adapt the same structure for the production tenant.
It can be nice to have a BLF key on your phone keypad showing your Queue Agent status (Paused or Available, but also Logged in the queue or not). Let's examine the Pause/Unpaused.
You need to start creating a Flow/Variable to Toggle your pause status for a queue.
400px
Please note the special number assigned to the Flow/Variable to toggle it.
In the Monitoring section, specify what you like to monitor
400px
In the phone, you need to start monitoring an extension matching the 7000[EXT] you have defined (obviously you can choose whichever number), so for example, if your extension is 104 and your tenant code DEVEL, you should monitor 7000104-DEVEL.
Pressing the BLF key will toggle your pause status and the BLF key will show you the current status.
Validation
- Confirm the tenant selected in the top bar is Canistracci OIL before creating the example.
- Verify the created objects appear in the expected Configuration menu page.
- Place a controlled test call or run the related status check.
- Remove or disable temporary test numbers when the example is no longer needed.
Using a BLF key to monitor FMFM for an extension and toggle it with the key press
This example is written for the Canistracci OIL tenant. Create the objects with a Docs Demo prefix, test them on non-production numbers, and then adapt the same structure for the production tenant.
It can be nice to have a BLF key on your phone keypad showing your FMFM Status (Active for "IN USE").
You need to start creating a Flow/Variable to Toggle your FMFM extension status.
400px
Please note the special number assigned to the Flow/Variable to toggle it.
In the Monitoring section, specify what you like to monitor, in this case, "FMFM activated"
In the phone, you need to start monitoring an extension matching the 897[EXT] you have defined (obviously you can choose whichever number), so for example, if your extension is 104 and your tenant code DEVEL, you should monitor 897104-DEVEL.
400px
Pressing the BLF key will toggle your FMFM and the BLF key will show you the current status.

Validation
- Confirm the tenant selected in the top bar is Canistracci OIL before creating the example.
- Verify the created objects appear in the expected Configuration menu page.
- Place a controlled test call or run the related status check.
- Remove or disable temporary test numbers when the example is no longer needed.
Using a SIP loudspeaker device
This example is written for the Canistracci OIL tenant. Create the objects with a Docs Demo prefix, test them on non-production numbers, and then adapt the same structure for the production tenant.
A SIP loudspeaker device can be seen as a SIP phone with autoanswer, allowing anyone to dial in and have a message played. It can be comfortable to have a professional recorded, predefined message to be played, without relying on spoken words. To make this, you need to load the message in the system as a normal media file and then create a Flow playing the message
400px
Flows and the conferences are the only destinations allowed for the "Originate" Custom Destination
400px
Once created the Custom Destination, just use in your feature code of choice. Maybe you can add an "Authenticate" condition to avoid abuses.
400px
Validation
- Confirm the tenant selected in the top bar is Canistracci OIL before creating the example.
- Verify the created objects appear in the expected Configuration menu page.
- Place a controlled test call or run the related status check.
- Remove or disable temporary test numbers when the example is no longer needed.
Ask for the virtual extension to join and join the calling extension to it
This example is written for the Canistracci OIL tenant. Create the objects with a Docs Demo prefix, test them on non-production numbers, and then adapt the same structure for the production tenant.
Let's start by creating the media file for asking the virtual extension to join and press the # key. You can record yourself or use the Text to Speech facility.
Create a Custom Destination to read the virtual extension number. It will be stored in a channel variable named ${USR-virtual}
400px
Create a feature code to join the virtual extension number.
400px
Use that feature code using another feature code and passing the variable ${USR-virtual}
400px
Put all together
400px
Validation
- Confirm the tenant selected in the top bar is Canistracci OIL before creating the example.
- Verify the created objects appear in the expected Configuration menu page.
- Place a controlled test call or run the related status check.
- Remove or disable temporary test numbers when the example is no longer needed.
Play the agent name to the caller
This example is written for the Canistracci OIL tenant. Create the objects with a Docs Demo prefix, test them on non-production numbers, and then adapt the same structure for the production tenant.
We are going to check how to configure a cool feature, allowing the name of the agent to be played before connecting the agent. Not only, but we are going to use the time the name is played to the caller to remind to the agent the name of the queue they are answering.
Let's start by define a media file creating the message, containing the name of the agent, at runtime, using Text to Speech.
400px
As you may noticed, instead of the function ${CONNECTEDLINE(name)} I have used a variable, ${USR-agentname}. This is needed because you cannot easily recover functions from inside the Media File text box. Due to this limitation, I need to create another Custom Destination to define the variable ${USR-agentname} with the connected line name
400px
We want to play the agent name to the caller and in the same time play the name of the queue to the agent, so we define a static media file containing the name of the queue
We are going now to create the custom destination "Execute separately on channels when answer"
400px
It is important to use the Special Destination "Wait for caller execution completed" or otherwise the message to the caller will be cut when the message to the agent will finish playing.
Now you can use the defined Custom Destination to play the agent name to your callers entering the queue
400px
Validation
- Confirm the tenant selected in the top bar is Canistracci OIL before creating the example.
- Verify the created objects appear in the expected Configuration menu page.
- Place a controlled test call or run the related status check.
- Remove or disable temporary test numbers when the example is no longer needed.
Create a "press 1" campaign
This example is written for the Canistracci OIL tenant. Create the objects with a Docs Demo prefix, test them on non-production numbers, and then adapt the same structure for the production tenant.
With a "press 1" campaign I mean a campaign who will call a series of numbers and when one answers, it plays an advertisement message asking to press 1 to be connected with an operator.
We'll start by creating the advertisement message, using TTS and media file or you can just record it and upload.
400px
We can continue creating a queue for connecting the called numbers, if pressing 1
400px
Now we can create the IVR that will ask for the "press 1", using the media file created and connecting to the queue.
400px
Finally we can proceed in creating the campaign. Please refer to the Call Campaigns for details regarding the parameters and the type of campaign
400px

Validation
- Confirm the tenant selected in the top bar is Canistracci OIL before creating the example.
- Verify the created objects appear in the expected Configuration menu page.
- Place a controlled test call or run the related status check.
- Remove or disable temporary test numbers when the example is no longer needed.
Play a message to the called number, when answer
This example is written for the Canistracci OIL tenant. Create the objects with a Docs Demo prefix, test them on non-production numbers, and then adapt the same structure for the production tenant.
You can play a message to the called party using the Custom destination "Play to the called party when answer"
400px|Recording warning
The objective is to create a feature code, like *1021[NUM] that will execute the about custom destination and then connect the call to the [NUM] entered
You need to create a custom destination to forward the call to the number of your choice, passed as parameter for the feature code:
400px|Dial as NUM
You can use also a Forward To Custom destination, allowing more parameters
Here the final feature code:
400px|Dial and play a message
Validation
- Confirm the tenant selected in the top bar is Canistracci OIL before creating the example.
- Verify the created objects appear in the expected Configuration menu page.
- Place a controlled test call or run the related status check.
- Remove or disable temporary test numbers when the example is no longer needed.
Create a forwarding from an extension using a feature code
This example is written for the Canistracci OIL tenant. Create the objects with a Docs Demo prefix, test them on non-production numbers, and then adapt the same structure for the production tenant.
You can create a forwarding for the calling extension using a feature code. You need to define the feature code as the following:
400px
You can create also a feature code to disable the unconditional forward
400px
It is important to understand what happens when the forwarding is created in this way:
System checks if there is a Custom Destination "Forward To" for the number specified. If there is, it is used, if there is not, it is created with default configuration. In the Configuration/Settings menu is possible to specify the default callerID and default timeout used when custom destinations are created this way
400px
The defined Custom Destination is used in the "Unconditional Forward" destination
Validation
- Confirm the tenant selected in the top bar is Canistracci OIL before creating the example.
- Verify the created objects appear in the expected Configuration menu page.
- Place a controlled test call or run the related status check.
- Remove or disable temporary test numbers when the example is no longer needed.
Enable, disable, set and check a forwarding for a DID
This example is written for the Canistracci OIL tenant. Create the objects with a Docs Demo prefix, test them on non-production numbers, and then adapt the same structure for the production tenant.
You can configure the management of the forwarding for a DID using an IVR. The management can be done using a different DID, but let's do with the same DID, just to make things more complex.
Let's start from a very simple configuration, where the DID is pointed to a Queue. We'd like to forward this DID to an external number in case of needs, with the ability to set the external number.
400px
To accomplish all the feature we need, an IVR accepting the several options will be needed:
1) activate the forwarding on the DID
2) deactivate the forwarding on the DID
3) play the forwarding number configured
4) set a forwarding number
The key to having this working will be to use a variable to hold the forwarding number. So we are going to create one, named "FORWARDNUMBER"
400px
To set the forwarding number we need to create a small media file to ask for the forwarding number and then read and store the number in the variable using a custom destination
400px
To play the forwarding number we can use another custom destination
400px
To activate and deactivate the forwarding, we'll use the embedded special destination
We need now to create a custom destination to forward the call to the number contained in the variable, using the Forward To custom destination:
400px
Let's organize all in the same IVR
400px
Now, we can assign this DID to the IVR, but before we need to hide it, so it can be triggered when needed. We'll create a "Please wait while we connect to your destination" message and while this message is played, we'll read a pin code. If that is the correct one, the IVR will be activated, otherwise, the usual destination will be connected.
400px
Let's see how the DID is now configured:
400px
The resulting diagram will be
400px
Validation
- Confirm the tenant selected in the top bar is Canistracci OIL before creating the example.
- Verify the created objects appear in the expected Configuration menu page.
- Place a controlled test call or run the related status check.
- Remove or disable temporary test numbers when the example is no longer needed.
Mask/Withhold callerid when dialing out using a prefix
This example is written for the Canistracci OIL tenant. Create the objects with a Docs Demo prefix, test them on non-production numbers, and then adapt the same structure for the production tenant.
Masking or withholding the callerid when dialing out is directly supported with a special destination. You can use it in a Feature Code as follows
400px
Validation
- Confirm the tenant selected in the top bar is Canistracci OIL before creating the example.
- Verify the created objects appear in the expected Configuration menu page.
- Place a controlled test call or run the related status check.
- Remove or disable temporary test numbers when the example is no longer needed.
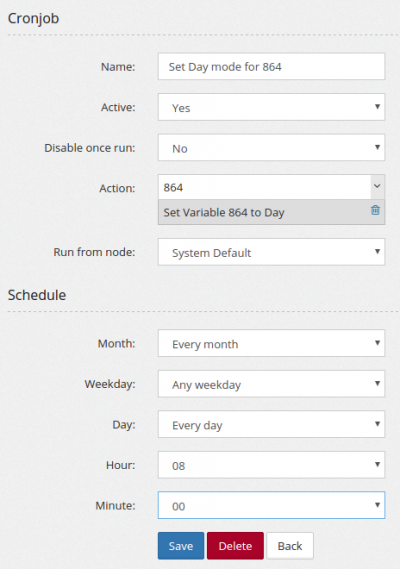
Create a Night/Day switch with automatic toggle
Let's focus on a common need. A BLF key to change from Night to Day mode, so it can be toggle anytime, but also to be automatic triggered at specified time.
The core of this feature is a Flow, so let's start creating a Flow containing the definition of a variable used to hold the status.
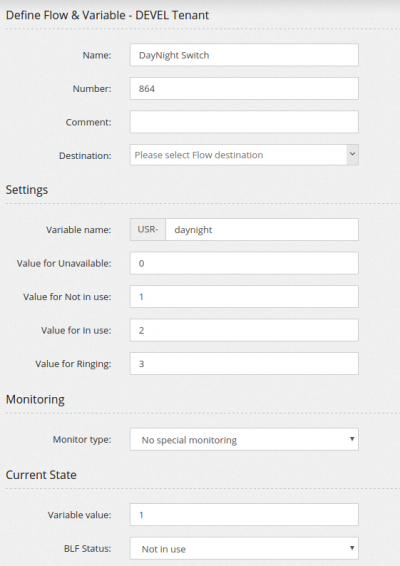
This Flow, assigned the number 864, can be monitored with the BLF 864-DEVEL (DEVEL is the tenant code for the tenant used)
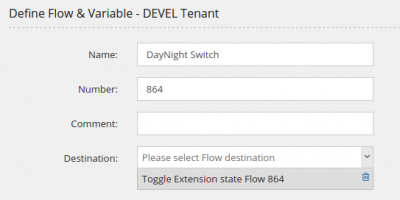
As you may have noticed, there is no destination for this Flow. Let's create a Custom Destination to toggle its status
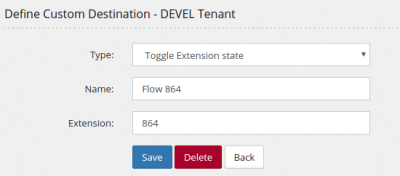
Now assign the Custom Destination above to the Flow, as action
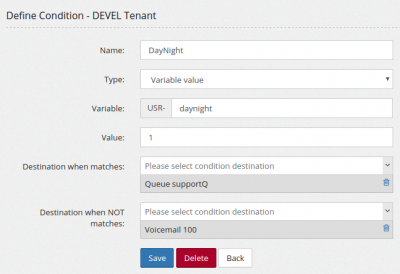
You can use this Flow variable in a Condition
Now the customer can switch the day/night condition using the BLF key, but he may need to have it automatically switched also at certain times.
We start by creating two Custom Destination to set to Day mode (1/Not In Use) and to set to Night mode (2/In Use)

And then use those in two Cronjobs to activate the day at 8am and the night at 7pm
Visual Voicemail
This example is written for the Canistracci OIL tenant. Create the objects with a Docs Demo prefix, test them on non-production numbers, and then adapt the same structure for the production tenant.
Visual Voicemail is a neat feature you can configure on some phones. For now only Cisco is supported. It allows you to browse your voicemails from the phone keyboard and retrieve/listen/delete voicemails directly from the phone keyboard, without using the handset or dialing anything.
In Cisco, access the Advanced configuration, Phone section and configure any of the LINE Key as following, replacing the values accordingly to your PBX
fnc=xml;url=the PBX web address related application page
400px
If you phone does't support https, it can be needed to allow HTTP usage in Admin/Settings
Validation
- Confirm the tenant selected in the top bar is Canistracci OIL before creating the example.
- Verify the created objects appear in the expected Configuration menu page.
- Place a controlled test call or run the related status check.
- Remove or disable temporary test numbers when the example is no longer needed.
How to secure the server and prevent/limit frauds?
This example is written for the Canistracci OIL tenant. Create the objects with a Docs Demo prefix, test them on non-production numbers, and then adapt the same structure for the production tenant.
It is not a question with a simple answer. You'll be hacked. Sooner or later you'll be hacked and you'll loose some money. That must be taken into account. However you can work in making it happen as late as possible and to lose the least money as possible. I am continuously working in making the platform as secure as possible and giving you the tools to minimize the problems connected with an hack.
How you'll be hacked
You can be hacked in several ways:
- Remote phone hacking. In this case, the hacker gains access to a remote phone and steal the credentials. Unfortunately most phone web interfaces are completely insecure and they should never be reachable from Internet. Some contains hard coded credentials, others allows easy configuration download. Even if not reachable from Internet, an hacker can use a compromised PC inside the LAN to access phones (usually with default credentials) and then transmit out the credentials collected.
- Password guessing. Even if almost impossible using the predefined 16 char random passwords, it is important to not assign dictionary passwords to phone or web interface accounts
- Web interface weakness. It happened an unchecked input allows a very slow but effective way for an unauthenticated user to recover the passwords from the database. This problem has been fixed, but it is not possible to be sure at 100% about any other problems connected to the code or libraries used.
How you can make it harder
- You can restrict the network addresses a client can use by listing them in Configuration/Settings. In the same place you can also put some restrictions about the usage time, so after certain time, no outbound calls can be made from a phone
- If a client has no need for international calls, don't authorize them. You can setup two different class of routing profiles, allowing international calls only for the clients really needed them
- Use GeoIP filtering. If you have all "local" clients, you can list the countries allowed to connect to the PBX.
- Use Fail2ban. Even if brute forcing a password seems quite impossible, the current network speed can lead to unexpected success.
- Filter SIP scanner. If they don't know you are a PBX, they will not try to hack you.
- Filter SIP useragent. You can set a filter so if a different user agent is used for the extension, even if the password is correct, the extension is locked.
How you can minimize the cost of an hacking
- Set limits on your provider. Nowadays every provider allows you to define a max daily spending amount.
- Set daily limits for extension and tenant in Admin/Security/Call Limits. That will be the max amount of money you are ready to lose in case of an hacking. Unfortunately it seems there is a method to fool asterisk in believing the call has been terminated while it continues on the provider side. This kind of trick was seen in two cases, but no further analysis was possible, so it is not confirmed working in the current version.
- Set cost limit for destination. I have never found a client needing to call an Inmarsat phone or some erotic line in Palestine. Set a limit on how much an allowed destination can cost in Admin/Security/Call Limits. You'll automatically black list all destinations used when an hack is performed.
What else can go wrong?
- Your SIP trunk provider credentials can be stolen, so call will be placed directly bypassing your PBX and any limit you can have setup. In this case, it is always better to apply limits also on your provider account. Most of them allow you to setup an upper daily usage limit
- Your datacenter can lose your server. Your nightmare has became true. Your server is no more accessible and your datacenter is informing you that due to an hardware failure/human mistake your server is no more (but don't worry, they will refund your last month invoice). Don't smile... it happened to me when I ask to move to another hardware because the one they rented me was defective. After a couple of days they admit they have lost my hard disk during the move. Doing backup and storing them in a different location is the only way to survive such disaster due not only to the described case, but any case where the server became unavailable. For best protection against any volunteer nasty action, store a copy of your backup (once a week can be fine) in an offline device, like an USB disk.
- Your datacenter can be hit by a DDOS or suffer any other network problem. Your server is alive, your data are intact, but your clients are down because your datacenter network speed is like an old DSL line. You can't even move out your data to a new datacenter because the speed is not enough. This can be due to a DDOS or a physical sabotage. A secondary server in another datacenter can save your life.
- Your datacenter connectivity is perfect, your SIP provider connectivity is perfect. All this when tested from your office. Unfortunately when your PBX tries to communicate with your SIP provider, you have 10% packet loss and each one is blaming the other. Having all PBX servers in the same datacenter and using only one SIP provider can be a risky business.
- Your datacenter can burn to the ground and even if your servers were stored in different building, they are all lost. Even if you decide to operate your business from one very good datacenter, it can be a nice idea to leave one server in a separate datacenter, even if it is not really serving customers, but just as last resort backup. https://www.searchenginejournal.com/ovh-data-center-fire-darkens-thousands-of-sites-worldwide/398485/

Validation
- Confirm the tenant selected in the top bar is Canistracci OIL before creating the example.
- Verify the created objects appear in the expected Configuration menu page.
- Place a controlled test call or run the related status check.
- Remove or disable temporary test numbers when the example is no longer needed.
Configure a remote PBX as part of the extension list
This example is written for the Canistracci OIL tenant. Create the objects with a Docs Demo prefix, test them on non-production numbers, and then adapt the same structure for the production tenant.
The case was more common than I initially though. The client you are going to move on the MiRTA PBX has several offices and not all of them will be immediately configured on the MiRTA PBX. So you'll have some extensions directly on the tenant and some other behind a remote PBX, like a FreePBX.
Let's make an example with a tenant named "TOWER"
Ext 4401 is on MiRTA PBX
Ext 4402 is on MiRTA PBX
Ext 4701 is on a remote FreePBX
Ext 4702 is on a remote FreePBX
Let's see how you can configure the tenant to allow any extension to call any other extension, as they are all on the MiRTA PBX
You need to start by creating a new extension, like 2000 and use that to register the FreePBX on MiRTA PBX. It is best to set it as "Trunk" extension, so the callerid will be correct for the calls. The FreePBX will be behind the extension 2000-TOWER.
Create a provider not using realtime account and assign the Peer Name as the extension used to register the FreePBX. In this case, 2000-TOWER. Set to be allowed to Allow custom extensions:
400px
Define a "custom prefix" for routing calls to the remote PBX. I used #100##, but you can use anything that will never be dialed directly. Create a routing profile rule going to the provider created above
400px
Now it is time to create a Custom Extension for each one of the extensions registered on the remote PBX. In the security section, you'll set the Security section as following:
400px
Validation
- Confirm the tenant selected in the top bar is Canistracci OIL before creating the example.
- Verify the created objects appear in the expected Configuration menu page.
- Place a controlled test call or run the related status check.
- Remove or disable temporary test numbers when the example is no longer needed.
Understanding DID, Queue and Extensions recordings
This example is written for the Canistracci OIL tenant. Create the objects with a Docs Demo prefix, test them on non-production numbers, and then adapt the same structure for the production tenant.
Recording is an hot topic. You may record for various reasons, from quality control to contract enforcement, you may want to always record or only when you request it. MiRTA PBX offers several configurations for recording.
DID recordings - You can configure DID recording, in this case, any call coming from that DID, will be recorded.
Warning, an attended transfer from an inbound call with DID recording will be recorded ONLY if the extension performing the transfer is set for recording. Once the attended transfer is complete, the call will continue to be recorded.
Extension recording - You can configure Extension recording, in this case, any call originating from the extension, will be recorded
Queue recording - You can configure Queue recording, in this case, any call originating from the Queue, will be recorded.
Let's see some common questions:
Q: I want to record all calls from and to my extension. Is it enough to set recording on my extension?
A: No, it is not. Setting recording on your extension will activate recording for any call you'll perform from your extension. It will not record calls to your extension. You need to activate recording on the DID or on the Queue to activate inbound call recordings.
Validation
- Confirm the tenant selected in the top bar is Canistracci OIL before creating the example.
- Verify the created objects appear in the expected Configuration menu page.
- Place a controlled test call or run the related status check.
- Remove or disable temporary test numbers when the example is no longer needed.
Configuring and using Ademco alarm receiver
This example is written for the Canistracci OIL tenant. Create the objects with a Docs Demo prefix, test them on non-production numbers, and then adapt the same structure for the production tenant.
Asterisk can receive alarms from Ademco compatible devices using the following protocols: Contact ID, Express 4+1, Express 4+2, High Speed and Super Fast.
The Asterisk application is quite simple and integrating it in a Multitenant PBX was not easy. Unfortunately, the configuration cannot be made from the tenant or maybe, I don't like to have the tenant to mess with this, so the configuration is reserved for the Admin, for now.
From a tenant point of view, in the DID destination, you need to choose the "Receive an Ademco Alarm report". When the alarm system will dial the number, the system will read the details and write an event entry in Status/Call History - Alarms received
400px
More columns are available, decoding the alarm received.
From an admin point of view, it is needed to map the caller ID of the alarm system to the tenant. You can do it in Admin/Tenants - Alarms Binding
400px
Validation
- Confirm the tenant selected in the top bar is Canistracci OIL before creating the example.
- Verify the created objects appear in the expected Configuration menu page.
- Place a controlled test call or run the related status check.
- Remove or disable temporary test numbers when the example is no longer needed.
Using Dial by Name Directory
This example is written for the Canistracci OIL tenant. Create the objects with a Docs Demo prefix, test them on non-production numbers, and then adapt the same structure for the production tenant.
Dial By Name directory is available using two special destinations:
- Dial by Name Directory, it asks for the first three digits of the name (and/or surname) and plays the list of extensions names matching the digits entered
- Dial by Name using the [NUM] dialed, it uses the parameter entered and plays the list of extensions names matching the digits in [NUM]
You can control which extensions and which voicemails to list in the Dial By Name by selecting the "Include in Dial By Name" option in Configuration/Extensions and Configuration/Voicemails
In Configuration/Settings you can control several options
- Always play directory name - allows to chose whether to play the full name of the extension or not and if ask for confirmation before dialing the extension
- Convert letters in numbers - permits to choose whether to convert letters in numbers from the first name or both first and second name
- Use voicemail greeting - when requesting confirmation, it will play the extension name. The conversion from text to speech is made using the configured service, but you can choose to use the greeting voicemail message, if uploaded or not.
- Customized "Please enter..." message - permits to choose a different message to ask for dialing three digits for the dial by name
Please note you can even upload your own customized recording for your name and choose it in the Configuration/Extension. There is a special destination to record and automatically assign the recording when dialing from your phone "Record Dial By Name message"

Validation
- Confirm the tenant selected in the top bar is Canistracci OIL before creating the example.
- Verify the created objects appear in the expected Configuration menu page.
- Place a controlled test call or run the related status check.
- Remove or disable temporary test numbers when the example is no longer needed.
Configuring Lenny chatbox
This example is written for the Canistracci OIL tenant. Create the objects with a Docs Demo prefix, test them on non-production numbers, and then adapt the same structure for the production tenant.
If you want to annoy the telemarketers with a Lenny chatbox, you can download the Lenny pack files from
the PBX web address
and decompress in your en language file:
cd /var/lib/asterisk/sounds/en
wget the PBX web address
unzip Lenny.zip
\rm Lenny.zip
Then create the custom destination "Run a Lenny style chatbox to annoy telemarketers" and leave the defaults file names
Validation
- Confirm the tenant selected in the top bar is Canistracci OIL before creating the example.
- Verify the created objects appear in the expected Configuration menu page.
- Place a controlled test call or run the related status check.
- Remove or disable temporary test numbers when the example is no longer needed.
Using different MOH for queues
This example is written for the Canistracci OIL tenant. Create the objects with a Docs Demo prefix, test them on non-production numbers, and then adapt the same structure for the production tenant.
You may have noticed, in the queue, you can't select the Music on Hold (MOH), but just choose what to play to the caller: ringing or MOH. This is because you need to select which MOH to play to the caller before entering the Queue. In this way you'll be able to use the same Queue with different MOH.
For example, you can have an IVR asking the client to select which department to call and have different music for them, like:
400px
Validation
- Confirm the tenant selected in the top bar is Canistracci OIL before creating the example.
- Verify the created objects appear in the expected Configuration menu page.
- Place a controlled test call or run the related status check.
- Remove or disable temporary test numbers when the example is no longer needed.
Blocking a port using the Custom Rules
This example is written for the Canistracci OIL tenant. Create the objects with a Docs Demo prefix, test them on non-production numbers, and then adapt the same structure for the production tenant.
You can add custom rules to block an IP port from generic access and grant only to a specific set of IP addresses
Let's make an example. if you want to block ssh port 22 from any access except from IP 192.168.1.100, you can enter the following data
-s 192.168.1.100/32 -p tcp --dport 22 -j ACCEPT
-p tcp --dport 22 -j DROP
Please take in mind all IP in the "Always allowed list" will be always allowed, regardless what has been entered in the Custom Rules field
Validation
- Confirm the tenant selected in the top bar is Canistracci OIL before creating the example.
- Verify the created objects appear in the expected Configuration menu page.
- Place a controlled test call or run the related status check.
- Remove or disable temporary test numbers when the example is no longer needed.
Setting a notification for Emergency Numbers - Kari's Law
This example is written for the Canistracci OIL tenant. Create the objects with a Docs Demo prefix, test them on non-production numbers, and then adapt the same structure for the production tenant.
When an emergency call is placed from a multi-line telephone system, a notification must be sent to on-site personnel, alerting them to the emergency. The notifications to an appropriate contact can take the form of phone calls, visual alerts on a monitor, audible alarms, text messages, and/or emails.
For more info on Kari's Law: https://www.bandwidth.com/blog/karis-law-compliance-mlts-911-and-what-that-means-for-your-business/
You can configuration an emergency notification with MIRTA PBX.
First, you need to configure which numbers you'd like to be treated as emergency numbers. In the Routing Profile you can set the emergency flag on any of your routing rules:
400px
Then, you need to create your emergency notification destination. It can be a simple SMS sent to the reception, like:
400px
Or calling the reception and playing a message
These destinations can be set in Configuration/Settings:
400px
Validation
- Confirm the tenant selected in the top bar is Canistracci OIL before creating the example.
- Verify the created objects appear in the expected Configuration menu page.
- Place a controlled test call or run the related status check.
- Remove or disable temporary test numbers when the example is no longer needed.
Configuring custom conversion string for Microsoft Azure TTS
This example is written for the Canistracci OIL tenant. Create the objects with a Docs Demo prefix, test them on non-production numbers, and then adapt the same structure for the production tenant.
Microsoft Azure TTS allows customizing the Text to Speech conversion, adjusting several parameters.
You need to use the following variables:
%%LANG%%
%%SEX%%
%%SHORTLANG%%
For example
<speak version='1.0' xml:lang='%%LANG%%'><voice xml:lang='%%LANG%%' xml:gender='%%SEX%%' name='%%SHORTLANG%%'>%%VOICETEXT%%</voice></speak>Validation
- Confirm the tenant selected in the top bar is Canistracci OIL before creating the example.
- Verify the created objects appear in the expected Configuration menu page.
- Place a controlled test call or run the related status check.
- Remove or disable temporary test numbers when the example is no longer needed.
Understanding autorefills and autocharges
This example is written for the Canistracci OIL tenant. Create the objects with a Docs Demo prefix, test them on non-production numbers, and then adapt the same structure for the production tenant.
Autorefills and Autocharges are two distinct features available from the Admin/Balance Dashboard page and they serve different purposes, even if the name may be similar.
The Autocharges applies a fixed amount of credit (or debit) to the tenant account, based on the schedule set. So, for example, if every month you apply a renting of $2 for each of the phone equipment, that is the correct place to configure it.
The autorefills instead restore a certain amount of credit into the tenant account. For example, you run a postpaid tenant and you want to reset to zero its credit every month, just set the autorefill to zero for that tenant. If every month you want to give a certain credit to the tenant to be used, set the autorefill to that amount and regardless how much the tenant has used, its credit will be set to that amount.
Validation
- Confirm the tenant selected in the top bar is Canistracci OIL before creating the example.
- Verify the created objects appear in the expected Configuration menu page.
- Place a controlled test call or run the related status check.
- Remove or disable temporary test numbers when the example is no longer needed.
Queue priorities and penalties
This example is written for the Canistracci OIL tenant. Create the objects with a Docs Demo prefix, test them on non-production numbers, and then adapt the same structure for the production tenant.
Before starting to use Queue rules, please verify to have it referenced in /etc/asterisk/extconfig.conf
queue_rules => odbc,asterisk1,queue_rules,1
queue_rules => odbc,asterisk2,queue_rules,2
When a queue is defined, you list the agents that will be part of the queue.
400px
Based on the strategy, when a call arrives, in this case, all extensions will ring. You may like to arrange the call pattern in more fancy ways, like in the following:
I want 106 to ring first and to ring 104 only if 106 is not available or busy and ring 102 only if both are unavailable or busy
You can achieve this configuration using the Penalties and arranging the agents in the following way
400px
I want 106 to ring first and to ring 104 and 102 only if 106 is busy or not available, after at least 60 seconds.
In this case, the caller will stay in the queue at least 60 seconds before being sent to 104 and 102, if 106 is unavailable or busy. To achieve this configuration, you need to use the Queue rules and the min and max queue penalty. So, arrange the queue penalty as following
400px
Set the min and max penalty
400px
Create a Queue rule as following and assign to the queue
400px
I want 106 to ring first and after 30 seconds to ring 104 and 102
In this case, you need to use the above agents configuration, but to use the queue raise penalty as following
400px
Validation
- Confirm the tenant selected in the top bar is Canistracci OIL before creating the example.
- Verify the created objects appear in the expected Configuration menu page.
- Place a controlled test call or run the related status check.
- Remove or disable temporary test numbers when the example is no longer needed.
Using the web phone
This example is written for the Canistracci OIL tenant. Create the objects with a Docs Demo prefix, test them on non-production numbers, and then adapt the same structure for the production tenant.
The portal has an embedded Web Phone using WebRTC and HTML5. You need to use a recent browser and configure your system for WebRTC. Please check Enabling WebRTC for how to enable it.
The Web phone is based on the work of https://github.com/InnovateAsterisk/Browser-Phone
400px
There are two main ways to use the Web phone:
- Using an Extension based user
- Using an Admin/User user
When using an Extension based user, you need to specify the option "Allow Web Phone usage"
400px
If the user hasn't the "Allow Web Panel Access", when connecting, he will be immediately connected to the Web Phone
If the user has the ability to use the Web Panel, when connected, a phone icon will show up in the upper right corner, opening the page with the Web Phone
400px
When using an Admin/User user, the "can Use Web Phone" privilege is required. This privilege is automatically assigned to the "Admin", "Tenant Admin" and "Restricted Admin" macro profiles.
If an extension has the "WebRTC Support" enabled, in Status/Peer Status, an additional icon will be shown in the action column, allowing to connect to the system with the Web Phone using that account
400px

Validation
- Confirm the tenant selected in the top bar is Canistracci OIL before creating the example.
- Verify the created objects appear in the expected Configuration menu page.
- Place a controlled test call or run the related status check.
- Remove or disable temporary test numbers when the example is no longer needed.
Using tenant variables to manage load balancing
This example is written for the Canistracci OIL tenant. Create the objects with a Docs Demo prefix, test them on non-production numbers, and then adapt the same structure for the production tenant.
As already mentioned, MiRTA PBX, using DNS SRV, can do high availability and load sharing, but not load balancing. It is however possible to perform a "cold" load balancing, moving tenants across your servers manually, but without the need for lots of configuration. Let's see how.
To be able to move a tenant from one server to another one is important to use the provisioning templates for his phones. In the provisioning template, you'll have a variable, server_host, containing the server the phone will connect. If you have 100 phones in a tenant, without using the tenant variable, you'll be forced to edit all 100 phones configuration for moving the phones from server A to server B. To avoid this you can enter the new server_host value in the tenant variable and enforce it. Tenant variables can be found in Admin / Provisioning / Variables - Tenant Variables
400px
You can change the entries as you like and then select the row and press "Enforce" at the bottom.
Validation
- Confirm the tenant selected in the top bar is Canistracci OIL before creating the example.
- Verify the created objects appear in the expected Configuration menu page.
- Place a controlled test call or run the related status check.
- Remove or disable temporary test numbers when the example is no longer needed.
Configuring Text to Speech and Speech to Text using Google Cloud
This example is written for the Canistracci OIL tenant. Create the objects with a Docs Demo prefix, test them on non-production numbers, and then adapt the same structure for the production tenant.
From the Google Console choose to CREATE PROJECT
400px
Name your project. Let's start with the Text to Speech project, for example Mirtapbx-TTS
400px
Choose API & Services and then + CREATE CREDENTIALS, create an API Key.
400px
From the Dashboard use the + ENABLE APIS AND SERVICES and search for Text to Speech
400px
Enable the API
400px
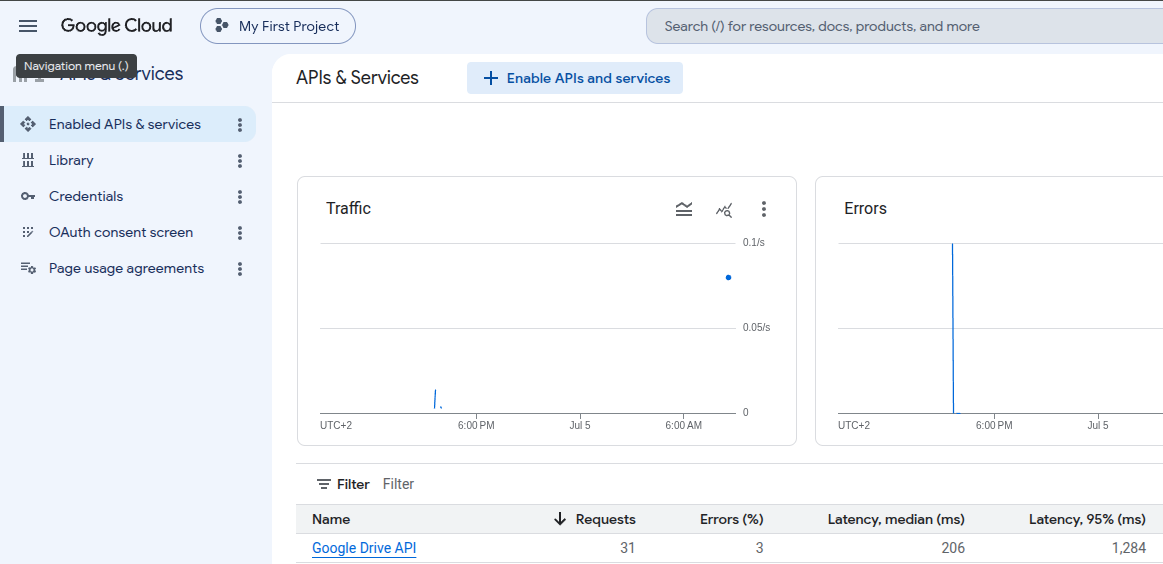
To use the Speech to Text API, just enable that API too, but you need to create also a Service Account and a bucket
400px
thumb
Validation
- Confirm the tenant selected in the top bar is Canistracci OIL before creating the example.
- Verify the created objects appear in the expected Configuration menu page.
- Place a controlled test call or run the related status check.
- Remove or disable temporary test numbers when the example is no longer needed.
Configuring Recording Storage using Google (Cloud Storage with a Service Account or Google Drive with a Personal Account)
Storing files in Google Drive can be done in two ways: using a Service Account (when you have Google Workspace) or using a Personal Account (when you have the normal @gmail.com email)
Cloud Storage using a Service Account
From within your Gmail workspace admin account, access the http://console.cloud.google.com/
Choose your project and enable the Cloud Storage API
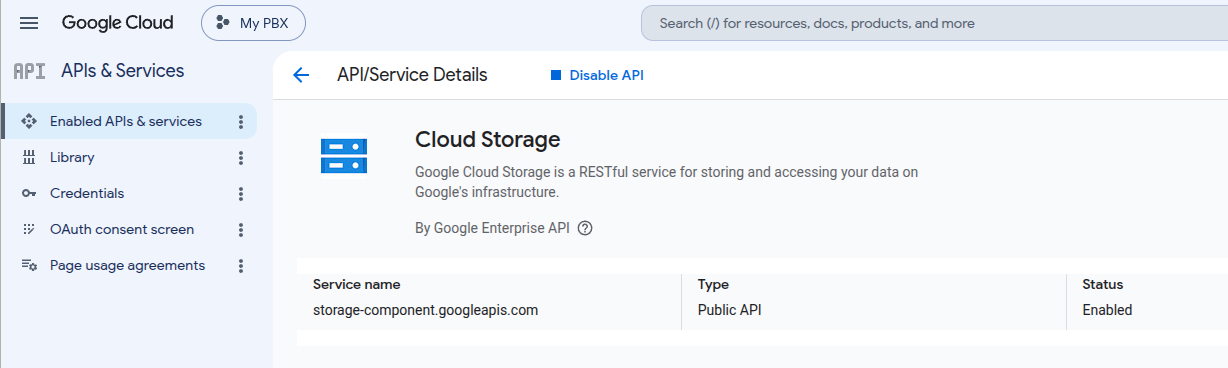
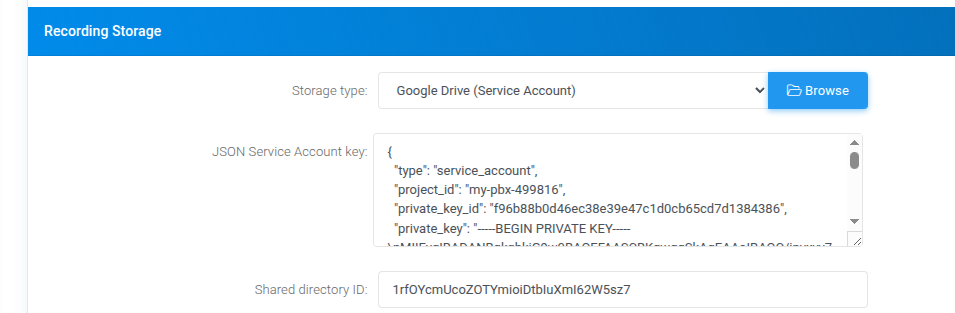
In the credentials page, create a service account and store the json file in your configuration.
The service account has an email associated, like recording@my-pbx-499816.iam.gserviceaccount.com
Use you Google Drive to share the directory you identify for storing your recording with this email. Take note of the directory ID from the URL and configure it

Google Drive using a Personal Account
From within your Gmail account, access the http://console.cloud.google.com/
Choose your project and enable the Google Drive API
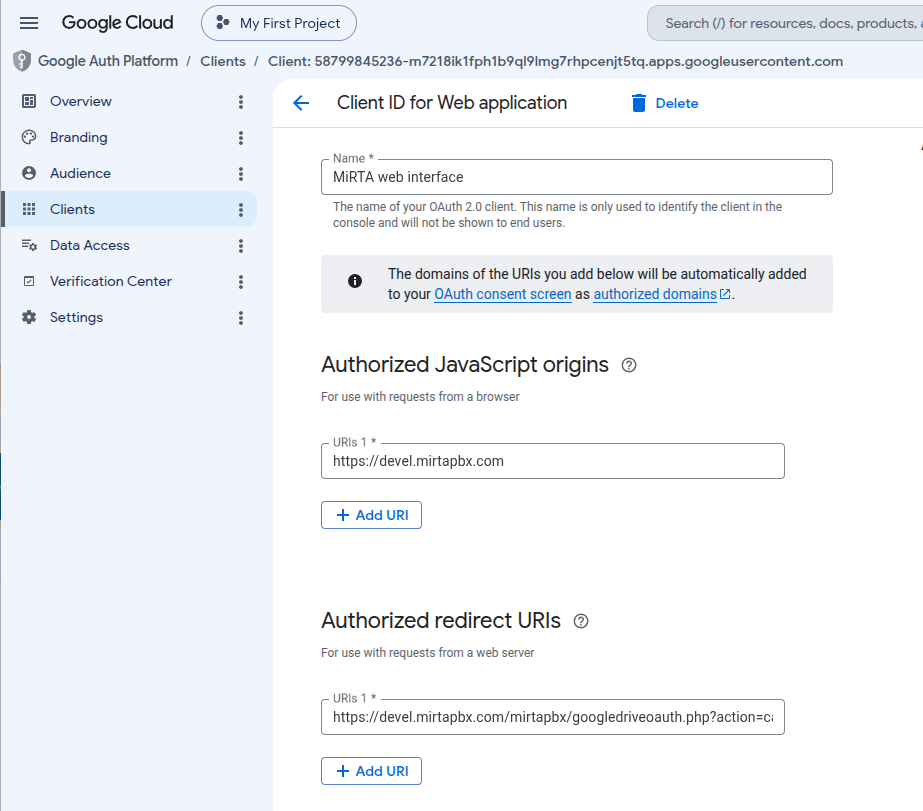
Move to the Credentials page and create a OAuth 2.0 Client IDs
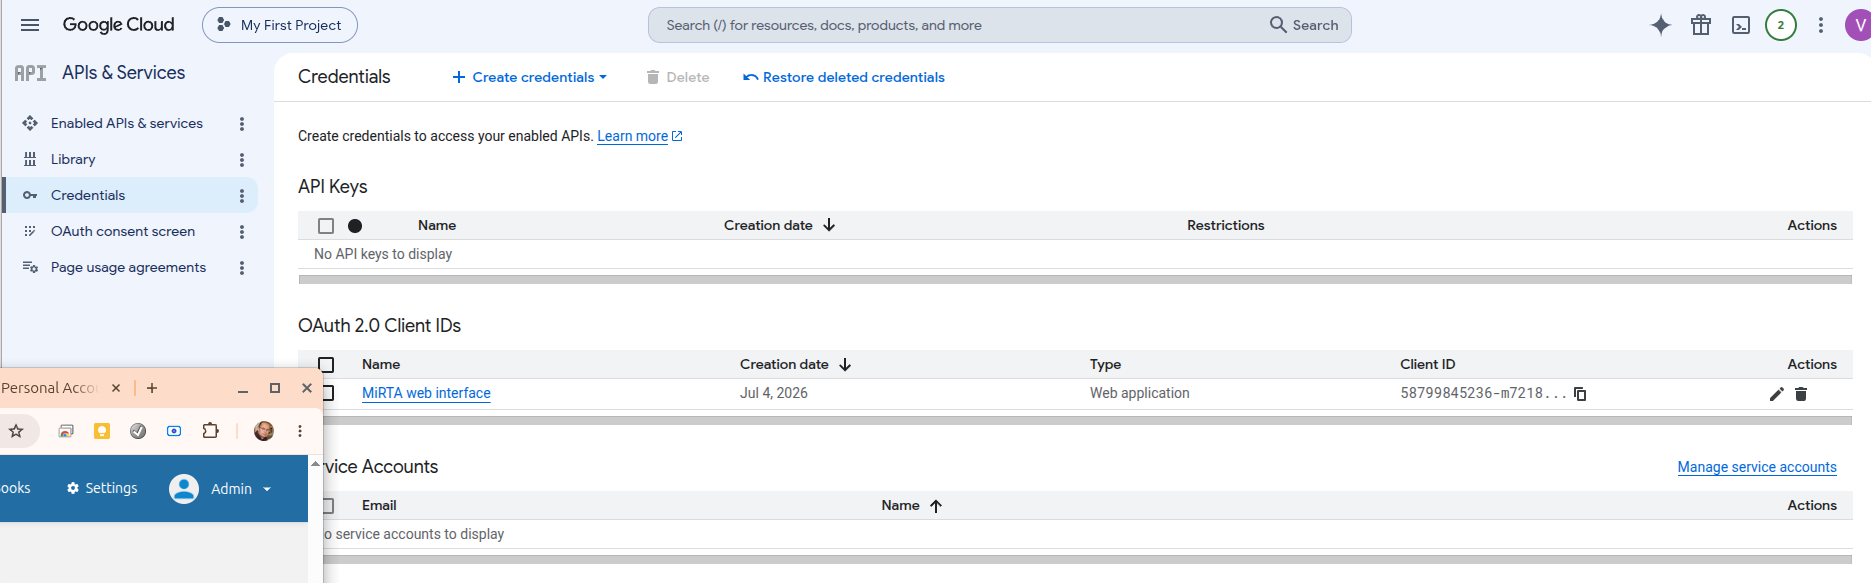
When you create the secret, you can download the json file only once. That will be used inside the Settings page:
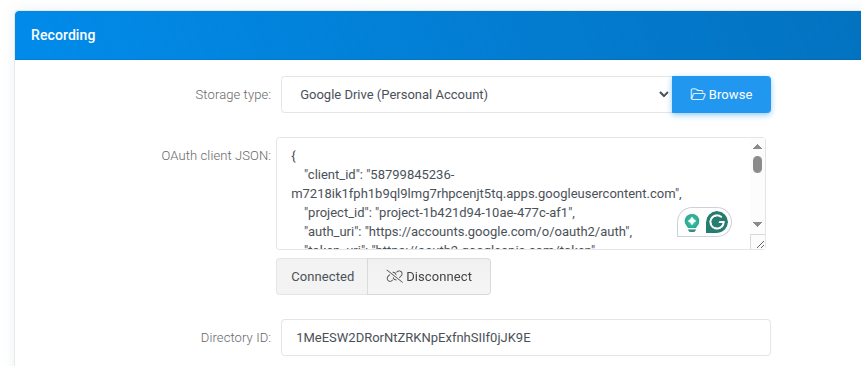
From the Google Drive create a directory and enter it to get the Recording ID in the address bar
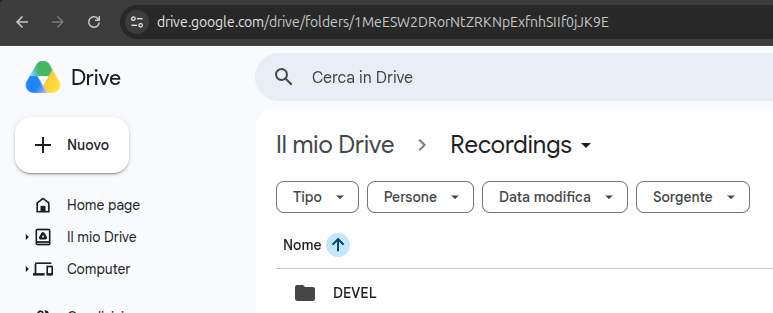
That will be used in the Settings page as above
Connect with the OAuth process. Currently the credentials needs to be used once every 6 months or will be disabled
Configuring a service using ChatGPT
This example is written for the Canistracci OIL tenant. Create the objects with a Docs Demo prefix, test them on non-production numbers, and then adapt the same structure for the production tenant.
You are now able to "talk" with your PBX and ask for info, recover information on the internet or trigger destinations in special case. Let's see some useful configuration. If you want to use Functions and Parameters (Variables), you need to use gpt-4-turbo with an API key connected with a paid account.
ChatGPT integration
The integration with ChatGPT is done using a custom destination named "Talk with a Generative Artificial Intelligence".
Providing information
ChatGPT is really helpful for providing information to the callers. There are mainly two big text boxes for providing the knowledge to ChatGPT. The first one, "System Content" describe how the ChatGPT must behave, if it needs to be brief, if it can provide general information based on its knowledge or only the one we are providing in the object. This is really important if you don't want your callers to ask ChatGPT questions not relevant about your business.
The other box, "User Content" allows you to upload all the information you want your ChatGPT to know. Let's see an example:
800px
The third box available, "Assistant Content" is not really useful and is what the ChatGPT has already told you. It is usually left empty
Testing
Before going live, connecting the Custom Destination to a DID or IVR menu entry, you can test the configuration in the bottom text box, using text.
800px
Verifying the talk
You can verify any talk your callers had with ChatGPT by checking the IA Logs from Status/Call History. If you want to get a recording of the ChatGPT conversation, you need to activate the recording by forcing it to record "early audio" or "force before answering". The call is not bridged. You can also receive the conversation by email at the end of each ChatGPT interaction. Don't forget to create the email template for it.
Putting the IA at work
Talking and giving information for the IA is an easy job, but let's put the IA to do some real work. In this case we want to use the IA to book an appointment, so when an appointment is requested, we are going to instruct the IA to ask for the weekday and the time for the appointment. This is the result of the configuration:
[
    {
        "name": "request_for_an_appointment",
        "description": "Request an appointment, get back the name of the assistant who will get in touch",
        "parameters": {
            "type": "object",
            "properties": {
                "weekday": {
                    "type": "string",
                    "description": "Weekday for the appointment"
                },
                "time": {
                    "type": "string",
                    "description": "Time for the appointment"
                },
                "name": {
                    "type": "string",
                    "description": "Name of the person asking for the appointment"
                }
            },
            "required": [
                "weekday",
                "time",
                "name"
            ]
        }
    }
]
This configuration is made by pressing the "Function" edit icon. It is important to describe each function, so the IA can pick the correct one based on the requests from the caller. It is of the same importance to describe each of the parameters. The names of the parameters, "name", "weekday" and "time" will be available in Asterisk as variables like USR-name, USR-weekday and USR-time, so you can use them in your configuration.
Using the data
The data provided to the IA can be used, in this case an email is sent and the name of the agent getting back to the caller is recovered from a condition
800px
800px
800px
The result
In the AI log, you can see the current call flow, like this one.
>> are what the caller says
<< are what the AI says
QQ is when a AI Function triggers with the arguments
AA is when the data is sent back to the AI for further processing
>> hello
<< Hello! How can assist you today
>>  I'd like to book an appointment
<< Sure, I can help you with that. Could you please provide me with the weekday and time you prefer for the appointment, as well as your name?
>>  my name is Leandro and I like the appointment on Tuesday at 11:00
QQ {"name":"request_for_an_appointment","arguments":"{\"weekday\":\"Tuesday\",\"time\":\"11:00\",\"name\":\"Leandro\"}"}
AA {"role":"function","name":"request_for_an_appointment","content":"{\"assistantname\":\"Mary\"}"}
<< Your appointment is set for Tuesday at 11:00 AM. Mary will be in touch with you to assist further. Is there anything else I can help you with?Validation
- Confirm the tenant selected in the top bar is Canistracci OIL before creating the example.
- Verify the created objects appear in the expected Configuration menu page.
- Place a controlled test call or run the related status check.
- Remove or disable temporary test numbers when the example is no longer needed.
Configuring push notification
This example is written for the Canistracci OIL tenant. Create the objects with a Docs Demo prefix, test them on non-production numbers, and then adapt the same structure for the production tenant.
Configuring push notification
If you have a mobile phone and you have developed your own softphone application, you may need to trigger a push notification to wake up your mobile application to be able to get your call. When you are dialing an extension and you have activated the "Push notification" checkbox, the script at /var/lib/asterisk/agi-bin/the related application page is triggered. You can't customize directly the the related application page script or otherwise it will be overwritten at each MiRTA PBX upgrade, instead you need to create a /var/lib/asterisk/agi-bin/the related application page script contaning at least a function like:
function pushnotification_custom($tenantid,$peername) {
...
}
The parameters will be the id of the tenant and the extension name, like 100-DEVEL. Nothing is expected in return. You pushnotification_custom function will do the real push notification.
If you need to wait until the extension is online, you can add the following code to your function:
$dbpeername=$dbconn->qstr($peername);
$steps=0;
while ($steps<30) {
$sql="select * from st_states where st_extension=$dbpeername";
$rs=$dbconn->Execute($sql);
$agi->verbose("Extension is in ".$rs->fields['st_state']);
if ($rs->fields['st_state']!='NOT_INUSE') {
sleep(1);
$steps++;
} else {
break;
}
}
Don't forget to use a global $dbconn command to inherit the database connection.
Validation
- Confirm the tenant selected in the top bar is Canistracci OIL before creating the example.
- Verify the created objects appear in the expected Configuration menu page.
- Place a controlled test call or run the related status check.
- Remove or disable temporary test numbers when the example is no longer needed.
Token authentication
This example is written for the Canistracci OIL tenant. Create the objects with a Docs Demo prefix, test them on non-production numbers, and then adapt the same structure for the production tenant.
If you like to integrate MiRTA PBX in your portal and you like to have a single authentication, you can create a token with the username and password for the user and pass to the the related application page script.
<?php
$key='*******';
$credentials['username']='*****';
$credentials['password']='*****';
$keyHash = hash('sha256', $key, true);
$iv = substr($keyHash, 0, 16);
define('AES_256_CBC', 'aes-256-cbc');
$token=base64_encode(openssl_encrypt(json_encode($credentials), AES_256_CBC, $keyHash, OPENSSL_RAW_DATA, $iv));
$decoded=openssl_decrypt(base64_decode($token),AES_256_CBC,$keyHash,OPENSSL_RAW_DATA, $iv);
error_log($token);
error_log($decoded);
?>
The generated token can be passed to the the related application page via GET or POST as parameter token
the PBX web address related application page
Validation
- Confirm the tenant selected in the top bar is Canistracci OIL before creating the example.
- Verify the created objects appear in the expected Configuration menu page.
- Place a controlled test call or run the related status check.
- Remove or disable temporary test numbers when the example is no longer needed.