System Administration
System-wide administration guide for providers, billing, provisioning, global configuration, PBX nodes, tenants, users, security, reporting, themes, defaults, and admin settings.
- Providers
- Overview
- Shared Provider Fields
- SIP Provider
- PJSIP Provider
- IAX2 Provider
- DAHDI Provider
- LOCAL Provider
- SMS Provider
- Billing
- Provisioning
- Global Configurations
- Media Files
- Custom Destinations
- Feature Codes
- Email Templates
- Email Template Profiles
- Do Not and Only Allow Call Lists
- Music on Hold
- Conditions
- Short Numbers
- Conduits
- Reserved Numbers
- Caller ID Blacklist
- AGI Scripts
- System Cronjobs
- PBX Nodes
- Routing Profiles
- Caller ID and DID Modifications
- Tenants
- Users
- User Profiles
- Global Lists
- Security
- Admin Stats
- Translations
- Themes
- New Items Defaults
- Settings
Providers
Providers administration tasks.
Overview
Providers are global carrier trunks or external services used by routing profiles, inbound DIDs, SMS delivery, and cost handling. Use Admin > Providers to create SIP, PJSIP, IAX2, DAHDI, LOCAL, or SMS providers and to review live channel counters.

Technology Selection
| Technology | Use for | Typical fictional example |
|---|---|---|
SIP | Legacy chan_sip carrier trunks or IP-authenticated SIP gateways. | Docs Telecom SIP Trunk at 203.0.113.20 |
PJSIP | Modern res_pjsip carrier trunks with endpoint, AOR, auth, and identify rows. | Docs Telecom PJSIP Trunk with TLS/SRTP |
IAX2 | IAX2 gateways or legacy interconnects. | Docs IAX2 Gateway on port 4569 |
DAHDI | Analog, PRI, or hardware channel-group routing controlled outside SIP/PJSIP realtime. | Docs Analog Gateway |
LOCAL | Local PBX routing targets that should be selected like a provider. | Docs Local Route |
SMS | SMS delivery via HTTP, JSON, SOAP, SIP MESSAGE, SMSPortal, or AGI script. | Docs SMS JSON Gateway |
Configuration Workflow
- Create or open a provider from Admin > Providers.
- Complete the shared identity, outbound, and inbound fields that apply to the selected technology.
- For SIP, PJSIP, or IAX2, enable Use Realtime Account when MiRTA PBX should maintain the Asterisk realtime rows.
- Save the provider only after replacing the fictional documentation values with carrier-supplied production values.
- Assign providers to routing profiles and test inbound DID matching, outbound dialing, caller ID presentation, and SMS delivery.
Operational Notes
- Provider changes are global and can affect multiple tenants, routing profiles, DIDs, and SMS routes.
- Use documentation-reserved IP addresses and example domains only for training material; never use them in production trunks.
- Provider-level CallerID and CallerID Name override extension-derived caller ID for every call through the provider.
- Max outbound channels prevents a trunk from being overused. When the limit is reached, routing can continue to another provider.
Shared Provider Fields
These fields appear on the provider page before technology-specific realtime options. Some fields are hidden when they do not apply to the selected provider technology.
Information

| Field | Applies to | Purpose | Fictional example |
|---|---|---|---|
| Name | All technologies | Friendly provider name shown in provider lists, route choices, reports, and provider-cost screens. | Docs Telecom SIP Trunk |
| Peer Name | All technologies | Stable technical identifier used by routing and, for realtime accounts, by Asterisk peer or endpoint rows. Keep it unique and avoid spaces. | docs_telecom_sip |
| Technology | All technologies | Selects the provider driver or service type. It controls which realtime and SMS fields are visible. | SIP, PJSIP, IAX2, DAHDI, LOCAL, or SMS |
| Status | All technologies | Controls whether the provider is usable. Enabled allows inbound and outbound use, Disabled removes it from routing, Only Inbound keeps inbound handling only. | Enabled |
| Provider Costs | Existing providers | Opens the provider-cost editor for rating or cost data associated with the provider. | Open costs for Docs Telecom SIP Trunk |
Outbound Calls

| Field | Applies to | Purpose | Fictional example |
|---|---|---|---|
| Additional Header 1-6 | SIP, PJSIP, IAX2, SMS | Adds SIP headers or SMS HTTP headers. Use one header per field in Header-Name: value format. | X-Account-Code: docs-demo |
| CallerID Presentation | SIP, PJSIP, IAX2, DAHDI, LOCAL | Controls privacy and screening information sent when routing calls through the provider. | Auto Privacy, CallerID not screened |
| Digits to Add | All outbound providers | Prepends digits to the called number before the call or SMS is sent to the provider. | +1 |
| Number of digits to Remove | All outbound providers | Removes leading digits from the called number before adding any outbound prefix. | 1 |
| CallerID Modifications | Voice providers | Optional outbound caller ID modification rule applied before the call leaves through this provider. | No Modifications or Docs US E164 CallerID |
| CallerID | Voice providers | Forces a caller ID number for every call using the provider. Leave blank to use extension-derived caller ID. | +15551230000 |
| CallerID Name | Voice providers | Forces a caller ID name for every call using the provider. Leave blank to use extension-derived caller ID name. | Docs Main |
| CallerID allowed regex | Voice providers | Validates caller ID numbers accepted by the carrier. If the current caller ID does not match, MiRTA PBX falls back to DID, extension, or tenant defaults. | ^\+1555[0-9]{7}$ |
| Max outbound channels | All outbound providers | Limits concurrent outbound channels. When the limit is reached, routing skips to another provider. Use Unlimited for no limit. | 12 |
| Penalty | All outbound providers | Provider selection weight used by routing and round-robin choices. Lower penalty is preferred. | 10 |
| Ignore SIP Cause codes | Voice providers | Continues to another provider even when this provider returns a SIP failure cause. | checked for fallback routing |
| Ignore BUSY | Voice providers | Continues to another provider when this provider returns BUSY and the route should keep searching. | checked for multi-carrier routes |
Inbound Calls

| Field | Applies to | Purpose | Fictional example |
|---|---|---|---|
| Inbound Digits to Add | Inbound voice providers | Prepends digits to the inbound DID or called number before destination matching. | +1 |
| Inbound Number of digits to Remove | Inbound voice providers | Removes leading digits from the inbound DID or called number before adding any inbound prefix. | 0 |
| DID Modifications | Inbound voice providers | Optional modification rule applied to inbound called numbers before DID matching. | Docs US DID Normalize |
| Same provider IN and OUT | Inbound and forwarded voice calls | Controls whether calls entering from the provider may also be sent out through the same provider. | Yes |
| Allow custom extensions | Inbound voice providers | Allows inbound calls from the provider to match custom extensions. Use only for trusted providers. | unchecked |
| Normalize number | Inbound voice providers | Removes URI or signaling decoration before matching the number to PBX destinations. | checked |
| Get number from | Inbound SIP/PJSIP-style signaling | Chooses where the inbound called number is read from: standard Request-URI, SIP To header, or a fixed value. | SIP To: Header |
| Set to | When Get number from is Set to | Fixed DID or destination number used instead of a number from signaling. | +15551239999 |
| Variable name 1-3 | Inbound voice providers | Custom inbound channel variable name stored with the USR- prefix for routing or dialplan logic. | ProviderName |
| Variable value 1-3 | Inbound voice providers | Value assigned to the matching custom inbound channel variable. | Docs Telecom SIP Trunk |
Save, Delete, and Back
| Field | Applies to | Purpose | Fictional example |
|---|---|---|---|
| Save | All providers | Stores the provider and creates, updates, or removes realtime account rows as required by the selected technology and Use Realtime Account. | Save after replacing all fictional values. |
| Delete | Existing providers | Deletes the provider and removes related realtime rows for SIP, PJSIP, or IAX2 providers. | Delete an unused Docs Test Provider after checking routing references. |
| Back | All providers | Returns to the Providers list without submitting the form. | Use after reviewing settings. |
| Floating Save | Long forms | Lets administrators save from lower sections without scrolling back to the bottom button row. | Visible while editing realtime account fields. |
SIP Provider
Use SIP technology for chan_sip provider trunks. SIP providers can create and maintain a global sipfriends realtime row when Use Realtime Account is enabled.

Common Realtime Fields
| Field | Applies to | Purpose | Fictional example |
|---|---|---|---|
| Use Realtime Account | SIP, PJSIP, IAX2 | Creates and maintains the Asterisk realtime peer, endpoint, AOR, auth, or IAX row for the provider. | checked |
| Transport | SIP, PJSIP | SIP signaling transport. For PJSIP this maps to transport objects such as transport-udp, transport-tcp, or transport-tls. | UDP or TLS |
| RTP Encryption (SRTP) | SIP, PJSIP | Enables SRTP media encryption when supported by the provider. PJSIP stores this as media_encryption=sdes. | No for standard UDP SIP, Yes for TLS/SRTP trunks |
| Host | SIP, PJSIP, IAX2 | Remote provider address. Use an IP address when inbound realtime matching must identify the carrier by source IP. | 203.0.113.20 |
| Port | SIP, PJSIP, IAX2 | Remote signaling port. Defaults are commonly 5060 for SIP/PJSIP and 4569 for IAX2. | 5060 |
| Outbound Proxy | SIP, PJSIP | Proxy URI or host used for outbound signaling when required by the carrier. | sip-proxy.example.invalid |
| Username | SIP, PJSIP, IAX2 | Authentication username sent to the provider. PJSIP stores this in ps_auths.username, chan_sip as defaultuser. | docs_sip_user |
| Password | SIP, PJSIP, IAX2 | Authentication secret for the provider. Use a unique carrier-supplied or generated secret. | FictionalSecret-2026 |
| Qualify | SIP, PJSIP | Enables SIP OPTIONS reachability checks and controls timeout behavior. | Yes |
| Qualify Frequency | SIP, PJSIP | Interval in seconds between provider reachability checks. | 60 secs |
| Codecs | SIP, PJSIP, IAX2 | Allowed audio codecs. MiRTA PBX stores disallow=all and the selected allow list. | alaw, ulaw, g722 |
| Session Expires | SIP, PJSIP | Maximum SIP session refresh interval in seconds. | 1800 |
| DTMF Mode | SIP, PJSIP | DTMF signaling method. PJSIP maps RFC 2833 to rfc4733. | RFC 2833/RFC 4733 |
| RTP Keepalive | SIP, PJSIP | Sends RTP keepalive packets to help keep NAT bindings and media paths active. | 5 seconds |
SIP-Only Fields
| Field | Applies to | Purpose | Fictional example |
|---|---|---|---|
| From User | SIP only | chan_sip fromuser value used in the SIP From header. | +15551230000 |
| From Domain | SIP only | chan_sip fromdomain value used when the provider requires a specific domain in the From header. | sip.example.invalid |
| Send RPID | SIP only | Controls whether caller identity is sent using Remote-Party-ID, P-Asserted-Identity, or both. | PAI |
| Trust RPID | SIP only | Controls whether inbound Remote-Party-ID or P-Asserted-Identity data is trusted for caller identity. | PAI |
| Trust Outbound for CallerID Presentation | SIP only | Controls how prohibited caller presentation is handled in RPID/PAI headers. | Legacy |
| Session Timers | SIP only | chan_sip session timer policy: accept remote requests, originate timers, or refuse timers. | Accept |
| Progress inband | SIP only | Controls whether Asterisk generates in-band progress audio before answer. | Yes |
| NAT | SIP only | chan_sip NAT behavior. force_rport,comedia is common for symmetric RTP and response routing. | force_rport,comedia |
| Call response timer (ms) - T1 | SIP only | Milliseconds to wait for response to SIP messages. | 500 |
| Call setup timer (ms) - B | SIP only | Maximum milliseconds to wait for call setup before autocongestion when no provisional response arrives. | 5000 |
| Can Reinvite | SIP only | Allows Asterisk to attempt direct media re-invites. Use No when recording, NAT, or media control should keep Asterisk in the RTP path. | No |
| Allow Transfer | SIP only | chan_sip allowtransfer. When enabled, the peer may request SIP REFER transfers. | No |
| Insecure | SIP only | chan_sip authentication matching option. Port, Invite is common for IP-authenticated trunks. | Port, Invite |
Fictional SIP Example
Name: Docs Telecom SIP Trunk
Peer Name: docs_telecom_sip
Technology: SIP
Host: 203.0.113.20
Port: 5060
Username: docs_sip_user
From User: +15551230000
From Domain: sip.example.invalid
NAT: force_rport,comedia
Insecure: Port, InvitePJSIP Provider
Use PJSIP technology for res_pjsip provider trunks. MiRTA PBX maintains related ps_endpoints, ps_aors, ps_auths, and ps_endpoint_id_ips rows when realtime is enabled.

Common Realtime Fields
| Field | Applies to | Purpose | Fictional example |
|---|---|---|---|
| Use Realtime Account | SIP, PJSIP, IAX2 | Creates and maintains the Asterisk realtime peer, endpoint, AOR, auth, or IAX row for the provider. | checked |
| Transport | SIP, PJSIP | SIP signaling transport. For PJSIP this maps to transport objects such as transport-udp, transport-tcp, or transport-tls. | UDP or TLS |
| RTP Encryption (SRTP) | SIP, PJSIP | Enables SRTP media encryption when supported by the provider. PJSIP stores this as media_encryption=sdes. | No for standard UDP SIP, Yes for TLS/SRTP trunks |
| Host | SIP, PJSIP, IAX2 | Remote provider address. Use an IP address when inbound realtime matching must identify the carrier by source IP. | 203.0.113.20 |
| Port | SIP, PJSIP, IAX2 | Remote signaling port. Defaults are commonly 5060 for SIP/PJSIP and 4569 for IAX2. | 5060 |
| Outbound Proxy | SIP, PJSIP | Proxy URI or host used for outbound signaling when required by the carrier. | sip-proxy.example.invalid |
| Username | SIP, PJSIP, IAX2 | Authentication username sent to the provider. PJSIP stores this in ps_auths.username, chan_sip as defaultuser. | docs_sip_user |
| Password | SIP, PJSIP, IAX2 | Authentication secret for the provider. Use a unique carrier-supplied or generated secret. | FictionalSecret-2026 |
| Qualify | SIP, PJSIP | Enables SIP OPTIONS reachability checks and controls timeout behavior. | Yes |
| Qualify Frequency | SIP, PJSIP | Interval in seconds between provider reachability checks. | 60 secs |
| Codecs | SIP, PJSIP, IAX2 | Allowed audio codecs. MiRTA PBX stores disallow=all and the selected allow list. | alaw, ulaw, g722 |
| Session Expires | SIP, PJSIP | Maximum SIP session refresh interval in seconds. | 1800 |
| DTMF Mode | SIP, PJSIP | DTMF signaling method. PJSIP maps RFC 2833 to rfc4733. | RFC 2833/RFC 4733 |
| RTP Keepalive | SIP, PJSIP | Sends RTP keepalive packets to help keep NAT bindings and media paths active. | 5 seconds |
PJSIP-Specific Fields
| Field | Applies to | Purpose | Fictional example |
|---|---|---|---|
| Transport | PJSIP only | Maps to the selected PJSIP transport object. Use TLS when the carrier requires encrypted signaling. | TLS |
| Host and Port | PJSIP only | Used to build the AOR contact and, when Host is an IP address, the endpoint identify match. | 198.51.100.30:5061 |
| Username and Password | PJSIP only | Stored in ps_auths. If username is empty, MiRTA PBX does not attach username/password auth. | docs_pjsip_user |
| Outbound Proxy | PJSIP only | PJSIP outbound proxy string for the endpoint. | sip:edge.example.invalid;transport=tls |
| Send RPID | PJSIP only | Maps to PJSIP send_rpid and send_pai. | PAI |
| Direct Media | PJSIP only | Allows PJSIP to attempt direct RTP. Disable when NAT, recording, transcoding, or media control requires Asterisk in the RTP path. | No |
| Allow Transfer | PJSIP only | PJSIP allow_transfer. When enabled, the endpoint may request SIP REFER transfers. | No |
| RTP Encryption (SRTP) | PJSIP only | Stores media_encryption=sdes when enabled. | Yes |
| Qualify Frequency and Timeout | PJSIP only | Stored on the AOR as qualify_frequency and qualify_timeout. | 60 secs |
Fictional PJSIP Example
Name: Docs Telecom PJSIP Trunk
Peer Name: docs_telecom_pjsip
Technology: PJSIP
Transport: TLS
RTP Encryption: Yes
Host: 198.51.100.30
Port: 5061
Outbound Proxy: sip:edge.example.invalid;transport=tls
Send RPID: PAI
Direct Media: No
Allow Transfer: NoIAX2 Provider
Use IAX2 technology for IAX trunks and legacy interconnects. IAX2 uses fewer signaling fields than SIP/PJSIP and stores its realtime account in iaxfriends.

IAX2 Fields
| Field | Applies to | Purpose | Fictional example |
|---|---|---|---|
| Host | IAX2 only | Remote IAX2 peer address. | 203.0.113.45 |
| Port | IAX2 only | Remote IAX2 signaling/media port. | 4569 |
| Username | IAX2 only | Stored as the IAX2 username used for authentication. | docs_iax_user |
| Password | IAX2 only | IAX2 secret used for authentication. | FictionalSecret-2026 |
| Codecs | IAX2 only | Allowed codecs stored in the IAX realtime row. | alaw, ulaw |
| Use Realtime Account | IAX2 only | Creates or updates the row in iaxfriends. | checked |
Shared Routing Fields
IAX2 providers still use the shared outbound and inbound fields for digit manipulation, caller ID presentation, caller ID fallback, channel limits, penalties, and custom inbound variables.
Fictional IAX2 Example
Name: Docs IAX2 Gateway
Peer Name: docs_iax2_gateway
Technology: IAX2
Host: 203.0.113.45
Port: 4569
Username: docs_iax_user
Codecs: alaw, ulawDAHDI Provider
Use DAHDI technology for analog, PRI, or hardware channel-group resources that are managed by the telephony node outside SIP/PJSIP realtime. DAHDI providers do not show the realtime account block.

DAHDI Field Details
| Field | Applies to | Purpose | Fictional example |
|---|---|---|---|
| Technology | DAHDI only | Use when routing to analog, PRI, or channel-group resources managed by DAHDI outside SIP/PJSIP realtime. | DAHDI |
| Peer Name | DAHDI only | Identifier operators recognize as the DAHDI group or channel target. | dahdi_docs_group1 |
| CallerID Presentation | DAHDI only | Controls presentation flags applied before dialing through the DAHDI provider. | Auto Privacy and Screen |
| Digits to Add / Remove | DAHDI only | Normalizes outbound numbers for PSTN gateway expectations. | Remove 0, add blank |
| Get number from / Set to | Inbound DAHDI use | Sets or normalizes the inbound called number when signaling does not carry the DID in a SIP-style header. | Set to +15551234444 |
| Max outbound channels | DAHDI only | Protects limited analog or PRI capacity. | 4 |
Shared Fields Still Used
DAHDI providers still use provider name, peer name, status, outbound digit manipulation, caller ID presentation, caller ID overrides, caller ID allowed regex, max outbound channels, penalty, inbound digit manipulation, DID modifications, custom variables, and save/delete controls.
Fictional DAHDI Example
Name: Docs Analog Gateway
Peer Name: dahdi_docs_group1
Technology: DAHDI
Status: Enabled
Max outbound channels: 4
Get number from: Set to +15551234444LOCAL Provider
Use LOCAL technology when a PBX-local route should be selected by routing profiles like a provider. LOCAL providers do not create SIP, PJSIP, or IAX realtime rows.

LOCAL Field Details
| Field | Applies to | Purpose | Fictional example |
|---|---|---|---|
| Technology | LOCAL only | Uses a local route target instead of an external SIP/IAX/DAHDI carrier account. | LOCAL |
| Peer Name | LOCAL only | Stable local-route identifier for administrators and routing profiles. | docs_local_route |
| Digits to Add / Remove | LOCAL only | Normalizes the number before local routing. | No add, remove 0 |
| CallerID and CallerID Name | LOCAL only | Optionally forces caller ID for calls sent through the local route. | +15551230000 and Docs Local |
| Max outbound channels | LOCAL only | Limits local-route concurrency, or Unlimited when no limit is needed. | Unlimited |
| Inbound options | LOCAL when used for inbound-like routing | Can still normalize destination numbers and set custom variables before matching. | Normalize number checked |
Shared Fields Still Used
LOCAL providers still use common identity, status, outbound digit manipulation, caller ID controls, max outbound channels, penalty, inbound normalization, DID modification, and custom variable fields. Additional SIP/SMS headers and realtime account settings are hidden.
Fictional LOCAL Example
Name: Docs Local Route
Peer Name: docs_local_route
Technology: LOCAL
Status: Enabled
Max outbound channels: Unlimited
Penalty: 50SMS Provider
Use SMS technology for outbound text-message delivery. SMS providers reuse provider identity, status, outbound digit manipulation, additional headers, channel limits, and penalty fields, then expose protocol-specific delivery fields.
SMS Field Details
| Field | Applies to | Purpose | Fictional example |
|---|---|---|---|
| SMS Protocol | SMS only | Selects delivery method: Web URL, JSON Web URL, SOAP Web URL, SIP MESSAGE, SMSPORTAL, or AGISCRIPT. | JSONWEBURL |
| SIP Provider | SMS SIPMESSAGE | SIP provider used to send outbound SMS with SIP MESSAGE. | Docs Telecom SIP Trunk |
| SMS URL/AGI Script Name | WEBURL, JSONWEBURL, SOAPWEBURL, AGISCRIPT | HTTP endpoint or AGI script name used for delivery. | https://sms.example.invalid/v1/messages |
| SOAP Action | SOAPWEBURL | SOAPAction header value sent with SOAP SMS requests. | SendMessage |
| HTTP Content Type | JSONWEBURL, SOAPWEBURL | Content-Type header. Leave blank to use the protocol default when acceptable. | application/json or text/xml |
| User / Password | WEBURL, JSONWEBURL, SOAPWEBURL | HTTP authentication credentials when required by the SMS provider. | docs-json-user and a fictional secret |
| Client ID / API Secret | SMSPORTAL | SMSPortal credentials. MiRTA PBX uses them to request a bearer token before sending messages. | fictional-client-id |
| Post data | WEBURL | POST body in param=value¶m2=value format. Values are not automatically URL encoded. | to=${SMSDESTNUM}&text=${URIENCODE(${SMSTEXT})} |
| JSON data | JSONWEBURL | One field.path:value[:type] line per JSON field. Dot notation creates nested objects; numeric parts can create JSON arrays. | messages.0.content:${SMSTEXT} |
| SOAP data | SOAPWEBURL | SOAP or XML body sent to the SMS provider. | <Text>${SMSTEXT}</Text> |
| Additional Header 1-6 | SMS HTTP protocols | Extra HTTP headers for SMS requests. | Authorization: Bearer fictional-token |
JSON Web URL

JSON Web URL post data uses one line per JSON field in field.path:value[:type] format. Dot notation creates nested objects. Numeric path parts create numeric object keys which encode as JSON array indexes when sequential. Use :array to force a single-value array.
sender.number:${SMSSOURCENUM}
sender.name:${SMSNAME}
messages.0.destination:${SMSDESTNUM}
messages.0.content:${SMSTEXT}
message.metadata.tenant:${TENANTNAME}
recipients:${SMSDESTNUM}:arrayWeb URL

Web URL post data is sent as a raw form-style body. The script does not automatically URL encode values, so encode values explicitly when the provider requires it.
SOAP Web URL

SOAP Web URL sends the configured SOAP/XML body and optional SOAPAction header. Set HTTP Content Type to text/xml unless the provider documents a different value.
SMSPortal

SMSPortal uses the Client ID and API Secret to request a bearer token from the SMSPortal REST API before sending the message payload.
SIP MESSAGE

SIP MESSAGE sends the SMS through a selected SIP provider. Choose a SIP provider that is trusted and configured for message delivery.
AGI Script
AGISCRIPT runs the named AGI script for SMS delivery. Use this only for custom integrations maintained by the PBX administrator. The SMS URL/AGI Script Name field stores the script name.
Available SMS Variables
| Variable | Meaning |
|---|---|
${SMSDESTNUM} | Destination number after SMS routing and digit handling. |
${SMSSOURCENUM} | Source number for the message. |
${SMSNAME} | Peer or sender name available to the SMS script. |
${SMSTEXT} | Message text. |
${EMERGENCYNOTES} | Emergency notes from the extension when available. |
${TENANTNAME} | Tenant name. |
${BILLINGCODE} | Tenant billing code. |
${EXTRACODE} | Tenant extra code. |
${EXTRAFIELD001}, ${EXTRAFIELD002}, ${EXTRAFIELD003} | Tenant custom extra fields. |
Billing
Billing administration tasks.
Tenants Dashboard
Review tenant balances, usage exposure, and billing state.
Use Admin > Tenants Dashboard to manage tenants dashboard.
This page is a starting point for administrators: review existing records, add only the objects needed by the deployment, and keep names consistent across tenants, routing, and provisioning.
Typical Workflow
Documentation Example
For documentation and testing, use names prefixed with Docs Demo. Existing PBX nodes should be reused as examples; do not create additional nodes unless the deployment actually requires them.
Providers Dashboard
Review provider balance and traffic indicators.
Use Admin > Providers Dashboard to manage providers dashboard.
This page is a starting point for administrators: review existing records, add only the objects needed by the deployment, and keep names consistent across tenants, routing, and provisioning. The source form exposes these main blocks or fields: From, To.
Typical Workflow
Documentation Example
For documentation and testing, use names prefixed with Docs Demo. Existing PBX nodes should be reused as examples; do not create additional nodes unless the deployment actually requires them.
Main Fields
| Field or block | Purpose |
|---|---|
| From | Review this value in relation to the object being configured and the tenant or system scope where it is used. |
| To | Review this value in relation to the object being configured and the tenant or system scope where it is used. |
Outbound Call Rates
Maintain outbound rate tables used to price calls.
Use Admin > Outbound Call Rates to manage outbound call rates.
This page is a starting point for administrators: review existing records, add only the objects needed by the deployment, and keep names consistent across tenants, routing, and provisioning.
Typical Workflow
Documentation Example
For documentation and testing, use names prefixed with Docs Demo. Existing PBX nodes should be reused as examples; do not create additional nodes unless the deployment actually requires them.
Inbound Call Rates
Maintain inbound rate tables used for DID and inbound traffic billing.
Use Admin > Inbound Call Rates to manage inbound call rates.
This page is a starting point for administrators: review existing records, add only the objects needed by the deployment, and keep names consistent across tenants, routing, and provisioning.
Typical Workflow
Documentation Example
For documentation and testing, use names prefixed with Docs Demo. Existing PBX nodes should be reused as examples; do not create additional nodes unless the deployment actually requires them.
Conference Rooms Rates
Maintain rates applied to hosted conference-room usage.
Use Admin > Conference Rooms Rates to manage conference rooms rates.
This page is a starting point for administrators: review existing records, add only the objects needed by the deployment, and keep names consistent across tenants, routing, and provisioning.
Typical Workflow
Documentation Example
For documentation and testing, use names prefixed with Docs Demo. Existing PBX nodes should be reused as examples; do not create additional nodes unless the deployment actually requires them.
Provisioning
Provisioning administration tasks.
Phone Models
Maintain provisioning model definitions and templates for supported phones.
Use Admin > Phone Models to manage phone models.
This page is a starting point for administrators: review existing records, add only the objects needed by the deployment, and keep names consistent across tenants, routing, and provisioning. The source form exposes these main blocks or fields: Password, .
Typical Workflow
Documentation Example
For documentation and testing, use names prefixed with Docs Demo. Existing PBX nodes should be reused as examples; do not create additional nodes unless the deployment actually requires them.
Main Fields
| Field or block | Purpose |
|---|---|
| Password | Review this value in relation to the object being configured and the tenant or system scope where it is used. |
| | Review this value in relation to the object being configured and the tenant or system scope where it is used. |
Button Layout Templates
Maintain reusable button layouts for provisioned devices.
This page is a starting point for administrators: review existing records, add only the objects needed by the deployment, and keep names consistent across tenants, routing, and provisioning. The source form exposes these main blocks or fields: Password, .
Typical Workflow
Documentation Example
For documentation and testing, use names prefixed with Docs Demo. Existing PBX nodes should be reused as examples; do not create additional nodes unless the deployment actually requires them.
Main Fields
| Field or block | Purpose |
|---|---|
| Password | Review this value in relation to the object being configured and the tenant or system scope where it is used. |
| | Review this value in relation to the object being configured and the tenant or system scope where it is used. |
Custom Files
Manage global provisioning files that can be served to devices.
Use Admin > Custom Files to manage custom files.
This page is a starting point for administrators: review existing records, add only the objects needed by the deployment, and keep names consistent across tenants, routing, and provisioning.
Typical Workflow
Documentation Example
For documentation and testing, use names prefixed with Docs Demo. Existing PBX nodes should be reused as examples; do not create additional nodes unless the deployment actually requires them.
Variables
Define provisioning variables used by phone templates.
Use Admin > Variables to manage variables.
This page is a starting point for administrators: review existing records, add only the objects needed by the deployment, and keep names consistent across tenants, routing, and provisioning.
Typical Workflow
Documentation Example
For documentation and testing, use names prefixed with Docs Demo. Existing PBX nodes should be reused as examples; do not create additional nodes unless the deployment actually requires them.
Provisioned Phones
Review phones that have requested provisioning files.
Use Admin > Provisioned Phones to manage provisioned phones.
This page is a starting point for administrators: review existing records, add only the objects needed by the deployment, and keep names consistent across tenants, routing, and provisioning.
Typical Workflow
Documentation Example
For documentation and testing, use names prefixed with Docs Demo. Existing PBX nodes should be reused as examples; do not create additional nodes unless the deployment actually requires them.
Phone Model Examples
This page collects provisioning examples and phone-model notes for supported devices. Use them as starting points and adjust the templates to match the firmware and tenant requirements.
- Grandstream GXP2130
- SNOM 710
- Cisco SPA504G
- Yealink T28P
- AAstra/Mitel 6869i
- Htek UC903
Provisioning Templates
- Yealink pre v.72
- Yealink v.72
- Yealink v.72 - directory request
- Digium D40/D45 - MAC request
- Digium D40/D45 - directory request
- Polycom VVX - MAC request
- Polycom VVX - directory request
- Cisco 7940/60 - MAC request
- Cisco SPA5xx - MAC request
- AAstra/Mitel 6869i - MAC request
- AAstra/Mitel 6869i - MAC request (separate button layout)
- Grandstream GXP2130 - MAC request
- Grandstream GXP2130 with VPK - MAC request
- Grandstream - directory request
- Grandstream HT812 / HT814 - MAC request
- Grandstream GS Wave
- Htek UC903 - MAC request
- SNOM 7xx
- Sangoma S300 - MAC request
- Zoiper - QR Code
- Fanvil X4U
- Fanvil X4U - Reference XML
Grandstream Dialplan
Grandstream forces to use a dialplan on most call features. For some, you can skip the dialplan, but if you want to have BLF for Parking Lots, you need to customize the dial plan for your tenant. So for example, with a tenant code of DEVEL, you need to enter a dialplan entry like x+\-[\a-\z\A-\Z0-9]+
Polycom provisioning reset
How to Perform a Hard Reset
Use the below steps if the following is met:
The phone is on a boot loop and no longer going to the home menu
The default password or mac password doesn't work
If it's a 3rd party phone
The account is already canceled and you cannot access Account Manager or Admin Console to download the extension CSV
Reboot the phone and wait for the starting application.
While the phone is in the starting application wait for the cancel button to appear then press it.
The phone will show a 7 second count down. This is the only open window to press the key combination to go to the hard reset page.
VVX series (VVX300, 301, 310, 311, etc): Press and hold 1 3 5 within the 7-second count down until it prompts you to the password page
Sound Point IP 335: Press and hold 1 3 5 7 within the 7-second count down until it prompts you to the password page
Sound Point IP series (IP550,560,570, etc): Press and hold 4 6 8* within the 7-second count down until it prompts you to the password page
Conference Phone IP5000, 6000, 7000: Press and hold 1 3 5 7 within the 7-second count down until it prompts you to the password page
Enter the device's MAC ID as the password (e.g 0004f28619dc).
Press the 2nd soft key that corresponds to the mode or (encoding) to change it to A->abc or a->abc.
Then (for example) to select the letter F, press the 3 key three times.
Current Practice
Create or edit phone models in Admin > Provisioning > Phone Models. Keep model names precise, store templates in the phone model, and test with one phone before applying a template to many devices.
Global Configurations
Global Configurations administration tasks.
Media Files
Maintain global media files available beyond a single tenant.
Use Admin > Media Files to manage media files.
This page is a starting point for administrators: review existing records, add only the objects needed by the deployment, and keep names consistent across tenants, routing, and provisioning.
Typical Workflow
Documentation Example
For documentation and testing, use names prefixed with Docs Demo. Existing PBX nodes should be reused as examples; do not create additional nodes unless the deployment actually requires them.
Custom Destinations
Maintain global custom destinations shared with tenants.
Use Admin > Custom Destinations to manage custom destinations.
This page is a starting point for administrators: review existing records, add only the objects needed by the deployment, and keep names consistent across tenants, routing, and provisioning.
Typical Workflow
Documentation Example
For documentation and testing, use names prefixed with Docs Demo. Existing PBX nodes should be reused as examples; do not create additional nodes unless the deployment actually requires them.
Feature Codes
Maintain global feature codes.
Use Admin > Feature Codes to manage feature codes.
This page is a starting point for administrators: review existing records, add only the objects needed by the deployment, and keep names consistent across tenants, routing, and provisioning.
Typical Workflow
Documentation Example
For documentation and testing, use names prefixed with Docs Demo. Existing PBX nodes should be reused as examples; do not create additional nodes unless the deployment actually requires them.
Email Templates
Use Admin > Email Templates to manage email templates.
This page is a starting point for administrators: review existing records, add only the objects needed by the deployment, and keep names consistent across tenants, routing, and provisioning. The source form exposes these main blocks or fields: Email.
Typical Workflow
Documentation Example
For documentation and testing, use names prefixed with Docs Demo. Existing PBX nodes should be reused as examples; do not create additional nodes unless the deployment actually requires them.
Main Fields
| Field or block | Purpose |
|---|---|
| Review this value in relation to the object being configured and the tenant or system scope where it is used. |
Email Template Profiles
Group email templates into profiles.
Use Admin > Email Template Profiles to manage email template profiles.
This page is a starting point for administrators: review existing records, add only the objects needed by the deployment, and keep names consistent across tenants, routing, and provisioning.
Typical Workflow
Documentation Example
For documentation and testing, use names prefixed with Docs Demo. Existing PBX nodes should be reused as examples; do not create additional nodes unless the deployment actually requires them.
Do Not and Only Allow Call Lists
Maintain global call allow or block lists.
Use Admin > Do Not and Only Allow Call Lists to manage do not and only allow call lists.
This page is a starting point for administrators: review existing records, add only the objects needed by the deployment, and keep names consistent across tenants, routing, and provisioning. The source form exposes these main blocks or fields: Find a number.
Typical Workflow
Documentation Example
For documentation and testing, use names prefixed with Docs Demo. Existing PBX nodes should be reused as examples; do not create additional nodes unless the deployment actually requires them.
Main Fields
| Field or block | Purpose |
|---|---|
| Find a number | Review this value in relation to the object being configured and the tenant or system scope where it is used. |
Music on Hold
Maintain global music-on-hold definitions.
Use Admin > Music on Hold to manage music on hold.
This page is a starting point for administrators: review existing records, add only the objects needed by the deployment, and keep names consistent across tenants, routing, and provisioning.
Typical Workflow
Documentation Example
For documentation and testing, use names prefixed with Docs Demo. Existing PBX nodes should be reused as examples; do not create additional nodes unless the deployment actually requires them.
Conditions
Maintain global conditions that tenants can reference.
Use Admin > Conditions to manage conditions.
This page is a starting point for administrators: review existing records, add only the objects needed by the deployment, and keep names consistent across tenants, routing, and provisioning.
Typical Workflow
Documentation Example
For documentation and testing, use names prefixed with Docs Demo. Existing PBX nodes should be reused as examples; do not create additional nodes unless the deployment actually requires them.
Short Numbers
Maintain global short-number mappings.
Use Admin > Short Numbers to manage short numbers.
This page is a starting point for administrators: review existing records, add only the objects needed by the deployment, and keep names consistent across tenants, routing, and provisioning.
Typical Workflow
Documentation Example
For documentation and testing, use names prefixed with Docs Demo. Existing PBX nodes should be reused as examples; do not create additional nodes unless the deployment actually requires them.
Conduits
Maintain global conduits for integrations and data exchange.
Use Admin > Conduits to manage conduits.
This page is a starting point for administrators: review existing records, add only the objects needed by the deployment, and keep names consistent across tenants, routing, and provisioning.
Typical Workflow
Documentation Example
For documentation and testing, use names prefixed with Docs Demo. Existing PBX nodes should be reused as examples; do not create additional nodes unless the deployment actually requires them.
Reserved Numbers
Reserve numbers that tenants should not use.
Use Admin > Reserved Numbers to manage reserved numbers.
This page is a starting point for administrators: review existing records, add only the objects needed by the deployment, and keep names consistent across tenants, routing, and provisioning.
Typical Workflow
Documentation Example
For documentation and testing, use names prefixed with Docs Demo. Existing PBX nodes should be reused as examples; do not create additional nodes unless the deployment actually requires them.
Caller ID Blacklist
Maintain global caller ID blacklist entries.
Use Admin > Caller ID Blacklist to manage caller id blacklist.
This page is a starting point for administrators: review existing records, add only the objects needed by the deployment, and keep names consistent across tenants, routing, and provisioning.
Typical Workflow
Documentation Example
For documentation and testing, use names prefixed with Docs Demo. Existing PBX nodes should be reused as examples; do not create additional nodes unless the deployment actually requires them.
AGI Scripts
Maintain global AGI script definitions.
Use Admin > AGI Scripts to manage agi scripts.
This page is a starting point for administrators: review existing records, add only the objects needed by the deployment, and keep names consistent across tenants, routing, and provisioning.
Typical Workflow
Documentation Example
For documentation and testing, use names prefixed with Docs Demo. Existing PBX nodes should be reused as examples; do not create additional nodes unless the deployment actually requires them.
System Cronjobs
Maintain system-level scheduled tasks.
Use Admin > System Cronjobs to manage system cronjobs.
This page is a starting point for administrators: review existing records, add only the objects needed by the deployment, and keep names consistent across tenants, routing, and provisioning.
Typical Workflow
Documentation Example
For documentation and testing, use names prefixed with Docs Demo. Existing PBX nodes should be reused as examples; do not create additional nodes unless the deployment actually requires them.
PBX Nodes
PBX Nodes administration tasks.
Overview
Review and maintain the PBX nodes that belong to the installation. Use the existing node as the documentation example.
Use Admin > Overview to manage overview.
This page is a starting point for administrators: review existing records, add only the objects needed by the deployment, and keep names consistent across tenants, routing, and provisioning.
Typical Workflow
Documentation Example
For documentation and testing, use names prefixed with Docs Demo. Existing PBX nodes should be reused as examples; do not create additional nodes unless the deployment actually requires them.
Routing Profiles
Routing Profiles administration tasks.
Overview
Create routing profile containers for voice, SMS, and fax routing rules.
Use Admin > Overview to manage overview.
This page is a starting point for administrators: review existing records, add only the objects needed by the deployment, and keep names consistent across tenants, routing, and provisioning.
Typical Workflow
Documentation Example
For documentation and testing, use names prefixed with Docs Demo. Existing PBX nodes should be reused as examples; do not create additional nodes unless the deployment actually requires them.
Create and Edit Routing Profile
A routing profile groups routing rules. Tenants, extensions, campaigns, fax features, and SMS features can use routing profiles to decide which provider or route should be used for an outbound destination.
Create the Routing Profile
- Open Admin > Routing Profiles.
- Select the add action.
- Enter a name, such as Docs Demo Voice Routing.
- Enter a short description explaining when this profile should be used.
- Select the type: Voice, SMS, or FAX.
- Save the profile.
Add Routes
After the profile exists, add routing rules for the destinations that should use it. A typical voice profile starts with emergency, national, mobile, international, and fallback rules. Each rule should point to one or more providers and should be specific enough to avoid accidental matches.
Routing Profile Types
| Type | Use |
|---|---|
| Voice | Outbound voice calls and normal extension dialing. |
| SMS | Outbound SMS routing through SMS-capable providers. |
| FAX | Outbound fax routing where fax provider handling must be separated from voice routing. |
Test Routing
Use a limited test pattern and a known test number before assigning the profile to production tenants. Confirm which provider is selected, whether digit manipulation is correct, and whether caller ID rules match carrier requirements.
Caller ID and DID Modifications
Caller ID and DID Modifications administration tasks.
Overview
Define caller ID and DID modification rules applied during inbound or outbound processing.
Use Admin > Overview to manage overview.
This page is a starting point for administrators: review existing records, add only the objects needed by the deployment, and keep names consistent across tenants, routing, and provisioning.
Typical Workflow
Documentation Example
For documentation and testing, use names prefixed with Docs Demo. Existing PBX nodes should be reused as examples; do not create additional nodes unless the deployment actually requires them.
Tenants
Tenants administration tasks.
Overview
The Tenants page is the global administration area for creating, reviewing, and opening tenant records.
Open Tenants
- Log in with a user profile that has tenant administration permissions.
- Open Admin > Tenants.
- Select an existing tenant to edit it, or use the add action to create a new one.
What a tenant controls
A tenant defines the PBX boundary for extensions, DIDs, routing profiles, billing, call limits, recording storage, provisioning, and feature limits. Most configuration pages work against the tenant currently selected in the top bar.
Administrators only see tenants allowed by their user or group permissions, unless their profile allows access to all tenants.
Related page
See Edit a Tenant for a field-by-field explanation of the tenant form.
Edit Tenant
The Define Tenant form is based on the MiRTA PBX tenant template. Some fields can be hidden, locked, or unavailable depending on default-field rules and the administrator's permissions.
Each block below follows the sections shown in the tenant form. Use the screenshot to locate the block in the interface, then review the field descriptions for that block.
Information

Use the Information block to set the tenant identity, caller ID permissions, recording-related feature flags, default routing profiles, processing servers, and tenant status.
| Field | Description |
|---|---|
| Name | Tenant display name. It is used internally and can be any descriptive string. |
| Code | Unique tenant identifier. It is used when building extension usernames. Prefer letters only; avoid numbers, spaces, hyphens, and underscores. |
| Allow onnet calls from this tenant | Allows extensions in this tenant to place on-net calls. |
| Allow onnet calls to this tenant | Allows other tenants or on-net routes to call this tenant. |
| Allow any Caller ID usage when dialing out | Allows outbound calls to use caller IDs outside the normal tenant assignment. |
| Block any outbound call with wrong Caller ID | Rejects outbound calls when the caller ID is not valid for the tenant rules. |
| Allow incoming Caller ID usage when dialing out | Allows caller IDs received on inbound calls to be reused for outbound calls. |
| Allow incoming Caller ID with prefix usage when dialing out | Allows prefixed incoming caller IDs to be reused for outbound calls. |
| Allow any Caller ID usage when dialing out an emergency number | Relaxes caller ID restrictions for emergency calls. |
| Force recording for emergency calls | Forces recording on emergency calls. |
| Force using a pincode for onnet calls | Requires PIN-code authentication for on-net calls. |
| Allow transcript for recorded calls | Enables transcription options for recordings. Disabling it clears pending transcription requests and tenant-level transcript settings. |
| Allow summary for recorded calls | Enables AI summary options for recordings. Disabling it clears pending summary requests and tenant-level summary settings. |
| Allow sentiment and emotion analysis for recorded calls | Enables AI sentiment and emotion analysis for recordings. Disabling it clears pending sentiment requests and tenant-level sentiment settings. |
| Alert email | Email address used for tenant alerts. |
| Emergency recording email | Email address used for emergency-call recording notifications. |
| Default timezone | Tenant timezone. When blank, the server default is used. |
| Routing profile | Default outbound voice routing profile. If blank, outbound voice calls are not allowed by default. |
| Call campaign routing profile | Routing profile used by call campaigns. It can inherit the tenant default. |
| Fax routing profile | Routing profile used for fax traffic. It can inherit the default routing profile. |
| SMS Routing profile | Routing profile used for outbound SMS. If blank, outbound SMS is not allowed. |
| Email Template profile | Email template profile assigned to tenant-generated emails. |
| Default Cronjob server | Node used by tenant cron jobs. System Default uses the global default. |
| Default Campaign server | Node used by tenant campaigns. System Default uses the global default. |
| Fax server | Node used for tenant fax processing. System Default uses the global default. |
| Status | Enables the tenant, disables it, or disables it after an expiration date. |
| Expiration date | Date used when status is set to Expiration date. |
Server affinity

Use the Server affinity block to prefer specific nodes for services that can be hosted on different servers.
| Field | Description |
|---|---|
| Preferred Parking Lot server | Preferred node for tenant parking lots. Empty means system default. |
| Preferred Queue server | Preferred node for tenant queues. Empty means system default. |
Parking lots

Use the Parking lots block to define the call parking range and the node that hosts the tenant parking lot.
| Field | Description |
|---|---|
| Parking lot start number | First parking slot number. After changes, the parking module may need reload or Asterisk may need restart. |
| Parking lot end number | Last parking slot number. After changes, the parking module may need reload or Asterisk may need restart. |
| Parking lot server | Specific node hosting the parking lot, or Automatic. |
Recording Storage

Use the Recording Storage block to choose where call recordings are stored and which upload credentials or directories are used. Some fields appear only for the selected storage backend.
| Field | Description |
|---|---|
| Storage type | Recording backend: default, database, filesystem, FTP, SFTP, SSL-FTP, no storage, AWS S3, or Google Drive. Database retention applies only to database storage. |
| JSON Service Account key | Google Drive service account key, shown when Google Drive storage is selected. |
| Host / Region | FTP/SFTP host, optionally with port, or AWS region when AWS S3 is selected. |
| User / Key | FTP/SFTP username or AWS access key. |
| Password / Secret | FTP/SFTP password or AWS secret. |
| Use passive FTP | Enables passive FTP mode for FTP/SSL-FTP storage. |
| Directory / Bucket name / Shared directory ID | Filesystem or FTP directory, AWS bucket, or Google Drive shared directory ID. |
| Upload recording at call end | Controls whether recordings are uploaded immediately at call end or only by batch processing. |
| Remove recordings on database expiration | Deletes the recording file when recording metadata expires from the database. It is not retroactive. |
Billing

Use the Billing block to define billing identifiers, call rating, payment mode, credit alerts, and on-net call billing behavior.
| Field | Description |
|---|---|
| Billing code | Code available to templates and integrations as ${BILLINGCODE}. |
| Use as dial prefix | Uses the billing code as a dial prefix. |
| Extra code | Additional code available as ${EXTRACODE}. |
| Billing type | Choose CDR billing, experimental CEL billing, or skip the billing module. |
| Call rate | Default call rate applied to the tenant, or no call rate. |
| Call campaign call rate | Call rate used by campaigns, or the normal call rate. |
| Default conference call rate | Default rate profile for conference room calls. |
| Payment type | Prepaid or post-paid billing mode. |
| Alert on credit lower than | Credit threshold that triggers alerts. Non-numeric values are treated as no alert. |
| Bill onnet calls | Controls whether on-net calls are billed. |
| On Net calls digits to add | Digits added to on-net numbers for normalization or billing. |
| On Net calls number of digits to remove | Digits removed from on-net numbers before normalization or billing. |
| Pay the bill media file | Audio message played when outbound dialing is blocked for payment reasons. |
Microsoft Teams integration

Use the Microsoft Teams integration block when the tenant is connected to Microsoft Teams services.
| Field | Description |
|---|---|
| MSTeams address | Gateway address used for Microsoft Teams integration. |
| Tenant ID | Microsoft Teams tenant ID used for extension status integration. |
Third party integration - Additional fields

Use the Third party integration - Additional fields block to store tenant-specific values consumed by external integrations.
| Field | Description |
|---|---|
| Preferred server | Preferred node used by third-party integration fields. |
| Field 001 | Custom integration value available as ${EXTRAFIELD001}. |
| Field 002 | Custom integration value available as ${EXTRAFIELD002}. |
| Field 003 | Custom integration value available as ${EXTRAFIELD003}. |
Security - Call Limits

Use the Security - Call Limits block to configure spend limits, warning thresholds, route cost limits, and abuse detection behavior.
| Field | Description |
|---|---|
| Apply call cost limits | Use system default, apply the limits below, or allow unlimited calling. |
| Extension daily/monthly call cost limit | Maximum daily or monthly spend per extension. When reached, outbound calls are blocked. |
| Tenant daily/monthly call cost limit | Maximum daily or monthly spend for the whole tenant. When reached, outbound calls are blocked. |
| Extension daily/monthly call cost warning | Spend threshold per extension that sends alert email before the hard limit is reached. |
| Tenant daily/monthly call cost warning | Spend threshold for the whole tenant that sends alert email before the hard limit is reached. |
| Domestic / International values | When split cost limits are enabled, separate domestic and international limits or warnings are shown. |
| Route call cost limit | Maximum allowed cost for a call route. More expensive routes are refused. |
| Abuse Detection | Locks an extension when suspicious calling activity is detected. Options include system default, off, or after 5, 10, 15, or 50 calls. |
Provisioning

Use the Provisioning block to control phone provisioning export behavior and the host name shown to provisioning clients.
| Field | Description |
|---|---|
| Optional export directory | Filesystem directory where phone provisioning files are exported. |
| Provisioning host name | Hostname shown in Configuration > Provisioning > Phones. If blank, MiRTA PBX uses the admin setting, theme, or current web host. |
Custom

Use the Custom block for tenant-specific custom dashboard behavior.
| Field | Description |
|---|---|
| Custom dashboard PHP file | Tenant-specific dashboard PHP file. |
Note

Use the Note block for internal tenant notes.
| Field | Description |
|---|---|
| Additional Info | Free-form internal note stored on the tenant. |
Restrictions

Use the Restrictions block to decide whether custom destination types are enabled by default or disabled by default for the tenant.
| Field | Description |
|---|---|
| Custom Destinations | Sets whether custom destinations are enabled by default or disabled by default, with an exception list selected in the multi-select control. |
Max number of

Use the Max number of block to set tenant capacity limits. A blank or non-numeric value is saved as unlimited by the tenant administration logic.
| Field | Description |
|---|---|
| Inbound/Outbound Channels | Maximum total external inbound plus outbound channels. |
| Inbound Channels | Maximum inbound external channels. |
| Outbound Channels | Maximum outbound external channels. |
| Any Channel | Maximum total channels regardless of source or destination. A normal call uses two channels. |
| Fax Channel | Maximum channels used for fax sending. |
| Extensions | Maximum extensions. |
| External Agents | Maximum external agents. |
| DIDs | Maximum DIDs. |
| Mediafiles | Maximum media files. |
| Conditions | Maximum conditions. |
| IVRs | Maximum IVRs. |
| Hunt Lists | Maximum hunt lists. |
| Conference Rooms | Maximum conference rooms. |
| Queues | Maximum queues. |
| Paging & Intercoms | Maximum paging and intercom groups. |
| Flows | Maximum flows. |
| Custom Destinations | Maximum custom destinations. |
| DISA | Maximum DISA entries. |
| Feature Codes | Maximum feature codes. |
| Short Numbers | Maximum short numbers. |
| CallerID Black List | Maximum caller ID blacklist entries. |
| Call Campaigns | Maximum call campaigns. |
| AGI Scripts | Maximum AGI scripts. |
| Conduits | Maximum conduits. |
| Voicemails | Maximum voicemail boxes. |
| Phone Books | Maximum phone books. |
| Provisioning | Maximum provisioning entries. |
Actions
| Action | Description |
|---|---|
| Save | Saves the tenant. When creating a tenant, MiRTA PBX also creates default settings, a parking lot, and assigns the creating user to the tenant. |
| Delete | Deletes the tenant and related tenant objects when the administrator has delete permission. The UI asks for confirmation. |
| Back | Returns to the tenant list without saving the current form. |
Users
Users administration tasks.
Overview
Manage administrator and operator accounts.
Use Admin > Overview to manage overview.
This page is a starting point for administrators: review existing records, add only the objects needed by the deployment, and keep names consistent across tenants, routing, and provisioning.
Typical Workflow
Documentation Example
For documentation and testing, use names prefixed with Docs Demo. Existing PBX nodes should be reused as examples; do not create additional nodes unless the deployment actually requires them.
User Profiles
User Profiles administration tasks.
Overview
Manage privilege profiles assigned to users.
Use Admin > Overview to manage overview.
This page is a starting point for administrators: review existing records, add only the objects needed by the deployment, and keep names consistent across tenants, routing, and provisioning.
Typical Workflow
Documentation Example
For documentation and testing, use names prefixed with Docs Demo. Existing PBX nodes should be reused as examples; do not create additional nodes unless the deployment actually requires them.
Global Lists
Global Lists administration tasks.
Admin CDRs
Review call history across tenants.
Use Admin > Admin CDRs to manage admin cdrs.
This page is a starting point for administrators: review existing records, add only the objects needed by the deployment, and keep names consistent across tenants, routing, and provisioning.
Typical Workflow
Documentation Example
For documentation and testing, use names prefixed with Docs Demo. Existing PBX nodes should be reused as examples; do not create additional nodes unless the deployment actually requires them.
DIDs List
Review DID assignments across tenants.
Use Admin > DIDs List to manage dids list.
This page is a starting point for administrators: review existing records, add only the objects needed by the deployment, and keep names consistent across tenants, routing, and provisioning.
Typical Workflow
Documentation Example
For documentation and testing, use names prefixed with Docs Demo. Existing PBX nodes should be reused as examples; do not create additional nodes unless the deployment actually requires them.
Extensions List
Review extension assignments across tenants.
Use Admin > Extensions List to manage extensions list.
This page is a starting point for administrators: review existing records, add only the objects needed by the deployment, and keep names consistent across tenants, routing, and provisioning.
Typical Workflow
Documentation Example
For documentation and testing, use names prefixed with Docs Demo. Existing PBX nodes should be reused as examples; do not create additional nodes unless the deployment actually requires them.
Media Files List
Review tenant media files from a global view.
Use Admin > Media Files List to manage media files list.
This page is a starting point for administrators: review existing records, add only the objects needed by the deployment, and keep names consistent across tenants, routing, and provisioning.
Typical Workflow
Documentation Example
For documentation and testing, use names prefixed with Docs Demo. Existing PBX nodes should be reused as examples; do not create additional nodes unless the deployment actually requires them.
External Agents List
Review external queue agents from a global view.
Use Admin > External Agents List to manage external agents list.
This page is a starting point for administrators: review existing records, add only the objects needed by the deployment, and keep names consistent across tenants, routing, and provisioning.
Typical Workflow
Documentation Example
For documentation and testing, use names prefixed with Docs Demo. Existing PBX nodes should be reused as examples; do not create additional nodes unless the deployment actually requires them.
Security
Security administration tasks.
Call Limits
Set system-level limits used to protect tenants and providers.
Use Admin > Call Limits to manage call limits.
This page is a starting point for administrators: review existing records, add only the objects needed by the deployment, and keep names consistent across tenants, routing, and provisioning.
Typical Workflow
Documentation Example
For documentation and testing, use names prefixed with Docs Demo. Existing PBX nodes should be reused as examples; do not create additional nodes unless the deployment actually requires them.
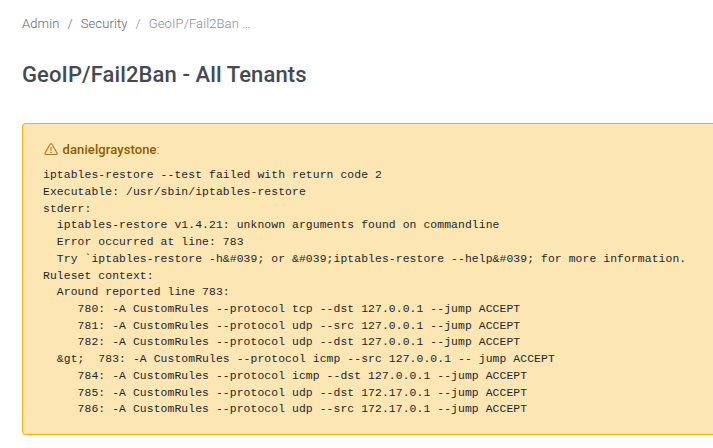
GeoIP and Fail2Ban Filters
Configure country filters, rate limits, Fail2Ban behavior, and blocked or trusted addresses.
Use Admin > GeoIP and Fail2Ban Filters to manage geoip and fail2ban filters.
This page is a starting point for administrators: review existing records, add only the objects needed by the deployment, and keep names consistent across tenants, routing, and provisioning. The source form exposes these main blocks or fields: GeoIP allowed countries, Locate IP Address, Enable VoIP Fail2Ban, Enable web interface Fail2Ban, Fail2Ban max attempts, Notify ban activity, Notify address, Notify sender address.
Typical Workflow
Documentation Example
For documentation and testing, use names prefixed with Docs Demo. Existing PBX nodes should be reused as examples; do not create additional nodes unless the deployment actually requires them.
Errors reported
The checkgeoipf2b.php script can report an error if the configuration data is incorrect, like in this case, when there is an extra space in the -- jump ACCEPT string.
Main Fields
| Field or block | Purpose |
|---|---|
| GeoIP allowed countries | Review this value in relation to the object being configured and the tenant or system scope where it is used. |
| Locate IP Address | Review this value in relation to the object being configured and the tenant or system scope where it is used. |
| Enable VoIP Fail2Ban | Review this value in relation to the object being configured and the tenant or system scope where it is used. |
| Enable web interface Fail2Ban | Review this value in relation to the object being configured and the tenant or system scope where it is used. |
| Fail2Ban max attempts | Review this value in relation to the object being configured and the tenant or system scope where it is used. |
| Notify ban activity | Review this value in relation to the object being configured and the tenant or system scope where it is used. |
| Notify address | Review this value in relation to the object being configured and the tenant or system scope where it is used. |
| Notify sender address | Review this value in relation to the object being configured and the tenant or system scope where it is used. |
| Whitelisted IPs | Review this value in relation to the object being configured and the tenant or system scope where it is used. |
| Autowhitelist from Tenants IP Restrictions | Review this value in relation to the object being configured and the tenant or system scope where it is used. |
| Autowhitelist from Tenants IP Registration | Review this value in relation to the object being configured and the tenant or system scope where it is used. |
| Allow SIP connections from only Allowed IP | Review this value in relation to the object being configured and the tenant or system scope where it is used. |
| Block known SIP scanners - Edit | Review this value in relation to the object being configured and the tenant or system scope where it is used. |
| SIP Scanners | Review this value in relation to the object being configured and the tenant or system scope where it is used. |
| Blocked IPs | Review this value in relation to the object being configured and the tenant or system scope where it is used. |
Raw Traffic
Inspect raw SIP or network traffic records for security and troubleshooting.
Use Admin > Raw Traffic to manage raw traffic.
This page is a starting point for administrators: review existing records, add only the objects needed by the deployment, and keep names consistent across tenants, routing, and provisioning.
Typical Workflow
Documentation Example
For documentation and testing, use names prefixed with Docs Demo. Existing PBX nodes should be reused as examples; do not create additional nodes unless the deployment actually requires them.
Register Attempts
Review registration attempts and authentication patterns.
Use Admin > Register Attempts to manage register attempts.
This page is a starting point for administrators: review existing records, add only the objects needed by the deployment, and keep names consistent across tenants, routing, and provisioning.
Typical Workflow
Documentation Example
For documentation and testing, use names prefixed with Docs Demo. Existing PBX nodes should be reused as examples; do not create additional nodes unless the deployment actually requires them.
Admin Stats
Admin Stats administration tasks.
Call Stats
Review global call statistics.
Use Admin > Call Stats to manage call stats.
This page is a starting point for administrators: review existing records, add only the objects needed by the deployment, and keep names consistent across tenants, routing, and provisioning.
Typical Workflow
Documentation Example
For documentation and testing, use names prefixed with Docs Demo. Existing PBX nodes should be reused as examples; do not create additional nodes unless the deployment actually requires them.
Admin Reports
Create and run global reports.
Use Admin > Admin Reports to manage admin reports.
This page is a starting point for administrators: review existing records, add only the objects needed by the deployment, and keep names consistent across tenants, routing, and provisioning. The source form exposes these main blocks or fields: Date start, Date end.
Typical Workflow
Documentation Example
For documentation and testing, use names prefixed with Docs Demo. Existing PBX nodes should be reused as examples; do not create additional nodes unless the deployment actually requires them.
Main Fields
| Field or block | Purpose |
|---|---|
| Date start | Review this value in relation to the object being configured and the tenant or system scope where it is used. |
| Date end | Review this value in relation to the object being configured and the tenant or system scope where it is used. |
Call Performance
Analyze call performance and related metrics.
Use Admin > Call Performance to manage call performance.
This page is a starting point for administrators: review existing records, add only the objects needed by the deployment, and keep names consistent across tenants, routing, and provisioning.
Typical Workflow
Documentation Example
For documentation and testing, use names prefixed with Docs Demo. Existing PBX nodes should be reused as examples; do not create additional nodes unless the deployment actually requires them.
Peer Status
Review peer status across the system.
Use Admin > Peer Status to manage peer status.
This page is a starting point for administrators: review existing records, add only the objects needed by the deployment, and keep names consistent across tenants, routing, and provisioning.
Typical Workflow
Documentation Example
For documentation and testing, use names prefixed with Docs Demo. Existing PBX nodes should be reused as examples; do not create additional nodes unless the deployment actually requires them.
Transcripts Status
Review transcript processing state.
Use Admin > Transcripts Status to manage transcripts status.
This page is a starting point for administrators: review existing records, add only the objects needed by the deployment, and keep names consistent across tenants, routing, and provisioning.
Typical Workflow
Documentation Example
For documentation and testing, use names prefixed with Docs Demo. Existing PBX nodes should be reused as examples; do not create additional nodes unless the deployment actually requires them.
Translations
Translations administration tasks.
Overview
Maintain translation strings used by the interface.
Use Admin > Overview to manage overview.
This page is a starting point for administrators: review existing records, add only the objects needed by the deployment, and keep names consistent across tenants, routing, and provisioning.
Typical Workflow
Documentation Example
For documentation and testing, use names prefixed with Docs Demo. Existing PBX nodes should be reused as examples; do not create additional nodes unless the deployment actually requires them.
Themes
Themes administration tasks.
Overview
The Themes page in Admin > Themes controls host-name based branding for the MiRTA PBX web interface. A theme can change the selected UI package, Smartadmin layout behavior, logos, login-page text, menu additions, custom templates, and switchboard access behavior.
Each theme is selected by matching the requested web host against Server Name Regex. Keep the most specific host patterns for branded domains and use a broad expression only for the default theme.

Working with themes
| Action | Explanation |
|---|---|
| Create | Use New Theme from the Themes list, complete the host pattern and branding fields, then save. |
| Edit | Select a theme from the list by clicking the server-name regex, theme name, or title. |
| Duplicate | Use the duplicate action when a new branded domain should start from an existing theme. |
| Delete | Delete only unused themes. Removing the active catch-all theme can leave the login page without the expected branding. |
| Validate host matching | Test each branded hostname after saving. Regex patterns are powerful, so a broad expression can unintentionally match more hostnames than expected. |
Theme editor
The editor is split into sections. The screenshots use fictional documentation values and should not be saved directly on a production system.


Field reference
| Field | Description |
|---|---|
| Server Name Regex | Matches the HTTP host name that should use this theme. Use a precise expression for a branded domain, or a broad expression only for a catch-all default theme. |
| Theme | Selects the installed UI theme package. The standard value is smartadmin. |
| Fixed header | Keeps the page header visible while scrolling. |
| Fixed navigation | Keeps the navigation panel fixed while page content scrolls. |
| Menu on top | Moves the main navigation from the side panel to a horizontal top menu. |
| Push content | Pushes page content when the mobile navigation is opened. |
| Force RTL (Right to Left) | Forces right-to-left layout for languages or deployments that require it. |
| Boxed layout | Constrains the page width instead of using the full browser width. |
| Hidden Menu | Collapses the navigation until the user hovers over the visible navigation area. |
| Minify Menu | Shows a compact icon-oriented navigation menu. |
| Bigger Font | Increases the interface font size. |
| Skin | Chooses the Smartadmin skin, such as light, default, or dark. |
| Color | Applies one of the predefined Smartadmin color themes or a custom color file. |
| Other Body Classes | Adds extra Smartadmin body classes for advanced layout customization. |
| Provisioning host name | Overrides the host name shown in provisioning-related pages and generated provisioning links. Leave empty to inherit the configured host. |
| Title | Sets the browser tab title. Enable Smart to append page-specific information. |
| Top Title | Sets the title shown in the top application area. HTML can be used for custom branding when needed. |
| Bottom message | Sets the footer or bottom message shown in the interface. |
| Additional menu | Adds custom menu entries. The field can use variables such as tenant code, selected tenant, tenant name, and username. |
| Additional Configuration item menu | Adds custom entries under the Configuration menu. |
| Additional Status item menu | Adds custom entries under the Status menu. |
| Additional Status/Stats item menu | Adds custom entries under the Status/Stats menu grouping. |
| Additional Admin item menu | Adds custom entries under the Admin menu. |
| Additional Bread item | Adds custom breadcrumb content. |
| Additional Head entries | Adds custom HTML entries to the page head. Use only trusted markup. |
| Logo Path | Path or URL for the logo image used by the theme. |
| Favicon Path | Path or URL for the browser favicon. |
| Custom CSS | Path to an extra CSS file loaded by the theme. |
| Custom Javascript | Path to an extra JavaScript file loaded by the theme. |
| Custom Login tpl | Template file used to override the login page for this theme. |
| Do not apply CSP | When enabled, the login page for this theme does not receive the Content Security Policy header. This is useful for legacy custom login templates while they are being updated. Leave it disabled when the custom login page is CSP-compatible. |
| Custom topmenu tpl | Template file used to override the top menu. |
| Custom dashboard tpl | Template file used to override the dashboard. |
| Custom Webphone URL | Alternative webphone URL. Use %%NAME%% to substitute the extension username. |
| Custom Wallboard ProxyAPI URL | Alternative Proxy API base URL used by wallboard integrations. |
| Max number of menu items | Controls how many Configuration menu items are displayed before the interface condenses them. This is applied at login time. |
| Max number of destination items shown | Limits the number of items displayed inside destination selectors. |
| Max number of Data Table items shown | Controls when larger lists switch to a grid-style view. |
| Default number of Data Table items show | Default page length for DataTable lists. |
| No menu items | Hides the main menu for this theme. |
| No header | Hides the page header for this theme. |
| Language | Forces a language for this theme, or leaves it on automatic browser detection. |
| Company | Company name shown on the login page. |
| Company Message | Main message shown on the login page. |
| Company Sub Message | Secondary login-page message. |
| Multiple clusters portal | Adds the cluster portal link for deployments that expose several clusters. |
| Switchboard login | Controls whether the login page shows a switchboard button, redirects to switchboard login, or shows no switchboard link. |
| Switchboard Favicon Path | Path or URL for the favicon used only by the switchboard page. Leave empty to keep the browser default behavior for the switchboard. |
CSP and custom login templates
The Do not apply CSP option is intentionally theme-specific. It allows old or highly customized login templates to keep working while they are being made compatible with the login-page Content Security Policy. For a hardened login page, leave this option disabled and update the custom login template so all scripts, images, frames, and styles comply with the CSP rules.
Operational notes
- Theme changes are evaluated at login and page-render time, so test both an authenticated page and the login page for each branded hostname.
- Custom CSS, JavaScript, template, and head-entry fields should point only to trusted files maintained by the PBX administrator.
- When using custom menus, keep links stable and avoid exposing tenant-specific administration links to users who should not access them.
- When Let's Encrypt or virtual-host creation is enabled in Admin Settings, the Themes list can also be used to review certificate and web-server configuration status.
New Items Defaults
New Items Defaults administration tasks.
Overview
Define defaults applied to newly created objects.
Use Admin > Overview to manage overview.
This page is a starting point for administrators: review existing records, add only the objects needed by the deployment, and keep names consistent across tenants, routing, and provisioning.
Typical Workflow
Documentation Example
For documentation and testing, use names prefixed with Docs Demo. Existing PBX nodes should be reused as examples; do not create additional nodes unless the deployment actually requires them.
Settings
Settings administration tasks.
Overview
Use Admin > Settings to manage global MiRTA PBX behavior. These settings are system-wide, so changes can affect multiple tenants, integrations, storage backends, and background jobs.
Working with Admin Settings
| Action | Description |
|---|---|
| Open | Open Admin > Settings from the Global Administration menu. |
| Review | Work section by section. Global changes should be checked against tenants, nodes, storage services, and integrations that depend on them. |
| Save | Use Save at the bottom of the form to apply changes. Some changes, such as upgrade, housekeeping, media-file, or test actions, run their own action from the relevant section. |
| Custom extension usernames | Enable Allow extensions with custom usernames in the Security section when SIP extensions must use usernames that do not follow the generated tenant-code format. |
Version

Use this section to check the installed software version, database schema status, available upgrades, and maintenance actions.
| Field or option | Purpose |
|---|---|
| Software in use | Sets the Software in use value for Version. |
| Database schema | Sets the Database schema value for Version. |
| Database upgrade (Select) | Selects the Database upgrade behavior for Version. |
Internationalization

Use this section for global locale defaults such as the system currency.
| Field or option | Purpose |
|---|---|
| Currency | Sets the Currency value for Internationalization. |
Dialing

Use this section for global dialing defaults, caller ID handling, DID matching, and feature-code restrictions.
| Field or option | Purpose |
|---|---|
| International prefix | Sets the International prefix value for Dialing. |
| Trunk prefix | Sets the Trunk prefix value for Dialing. |
| Country code | Country Code: You can specify the country code, like 39, so any call using the international prefix, but the country code, will not be treated as international |
| Voice messages language (Select) | Language: This option controls the selection of the language in Asterisk embedded message playback |
| Inbound CallerID Modifications (Select) | Selects the Inbound CallerID Modifications behavior for Dialing. |
| Allowed Outbound Digits | Sets the Allowed Outbound Digits value for Dialing. |
| DID matching (Select) | Allow DID matching for number only: When a DID is searched in the system, at least a match for areacode + number is required, when a provider sends only the number part. |
| Always route calls to provider (Checkbox) | Always route calls to provider: Even if the number dialed is defined on the PBX, route it to the provider. |
| Force selection of Caller ID (Checkbox) | Force selection of Caller ID: Force selection of a numeric Caller ID number, hide selection of ANONYMOUS and WITHHELD from extensions Caller ID selection |
| Force selection of Emergency Caller ID (Checkbox) | Force selection of Emergency Caller ID: Force selection of an emergency Caller ID. You can set it at tenant or extension level |
| Force feature codes to start by # or * (Checkbox) | Force feature codes to start either by # or *: By enabling this, a feature code must start by * or # otherwise you can use anything as feature code |
| Replace + with the international prefix (outbound) (Checkbox) | Replace + with the international prefix (outbound): By enabling this, when dialing out, it replaces the + with the international prefix |
| Allow Regex in DID number (Checkbox) | Allow Regex in DID number: Allow to use a regex for the number in the DID page. Be warned, a wrong regex can stop all calls |
License

Use this section to store the system license key.
| Field or option | Purpose |
|---|---|
| License key | Sets the License key value for License. |
API Interface

Use this section to manage global API credentials and API-side Asterisk result caching.
| Field or option | Purpose |
|---|---|
| General API Key | Sets the General API Key value for API Interface. |
| General Read Only API Key | Sets the General Read Only API Key value for API Interface. |
| Cache Asterisk results (seconds) | Cache Asterisk results (seconds): API calls can put heavy load on Asterisk, so you can specify a time in seconds to retain results and use as cache |
DB Data Retention

Use this section to define how long operational data remains in the database before cleanup. Recording metadata can have its own retention period, or it can follow the recording retention value when left empty.
| Field or option | Purpose |
|---|---|
| Advanced Call Detail info days | Advanced Call Detail info days: Sets the retention period for the Voipmonitor CDR data. You can access them from the call history, using the disposition link |
| Advanced Call Detail media (pcap and graphs) days | Advanced Call Detail media (pcap and graphs) days: Sets the retention period from the Voipmonitor pcap and graphs |
| Call history days | Call history days: Sets the retention days for call history, both Simple Call History and Complete Call History |
| SMS history days | SMS history days: Sets the retention days for SMS History |
| SMS retention days | SMS retention days: Sets the number of days to keep trying to send an SMS |
| Call Steps (CEL) history days | Call Steps (CEL) history days: Sets the retention days for the Call Steps data and CEL table |
| Queue history days | Queue history days: Sets the retention days for the queue history logs |
| Queue history days (informative data) | Queue history days (informative data): Sets the retention days for the informative events of the queue history, like NO FREE AGENTS and NOT THE RIGHT TIME |
| Provisioning and event history days | Sets the Provisioning and event history days value for DB Data Retention. |
| Provisioning feedback days | Sets the Provisioning feedback days value for DB Data Retention. |
| Activity log history days | Sets the Activity log history days value for DB Data Retention. |
| Recording holding days | Sets the Recording holding days value for DB Data Retention. |
| Recording metadata holding days | Sets how many days recording metadata such as transcripts, summaries, sentiment analysis, and AI analysis details remain in rm_recordingmetadatas. Leave empty to follow Recording holding days. |
| Voicemail message holding days | Sets the Voicemail message holding days value for DB Data Retention. |
| Fax holding days | Sets the Fax holding days value for DB Data Retention. |
| IVR log holding days | Sets the IVR log holding days value for DB Data Retention. |
| Conference log holding days | Sets the Conference log holding days value for DB Data Retention. |
| Process log holding days | Sets the Process log holding days value for DB Data Retention. |
| Reports default holding days | Sets the Reports default holding days value for DB Data Retention. |
Recording

Use this section for global call-recording storage, naming, conversion, upload, and post-processing behavior.
| Field or option | Purpose |
|---|---|
| Storage type (Select) | Storage type: Sets the storage backend for call recordings. Data retention limits are applied only to Database backend (for now). |
| JSON Service Account key (Text area) | Sets the JSON Service Account key value for Recording. |
| Host (Select) | Host: If your FTP server is not using the standard port 21, you can configure the desired port using a host:port syntax. |
| User | Sets the User value for Recording. |
| Password | Sets the Password value for Recording. |
| Directory | Sets the Directory value for Recording. |
| Recording name (Select) | Recording name: You can choose the name of the recording. When using a file based recording storage, it is important to add the Random prefix to avoid multiple legs recording to be overwritten |
| Recording format (Select) | Recording format: Sets the recording format using while capturing the audio during the call. There were multiple reports about audio corruption when using MS GSM audio |
| Recording conversion (Select) | Recording conversion: After the recording has been capturing and before uploading to the choosen storage, convert to a different format. |
| Process recording at call end (Select) | Process recording at call end: Sets if to process recording at call end. When using process at call end, the recording is available immediately after the call ends, but system load average is higher, higher database connection slots are used and the call duration recorded is slightly longer) When doing only batch process, there is a low impact on system load, lower database connection slots are used, but recordings are available after the scheduled time |
| Batch recording processing (Select) | Batch recording process: Sets when to process recording left on the system. If configured, the system tries to process/upload the call recording when call ends, but in case of transfers, the process/upload of the recording can be delayed and it is processed/uploaded in batch |
| Batch recording dynamic scaling (Select) | Batch recording dynamic scaling: Starts additional upload processes if there are lots of files to be uploaded |
| Batch recording matching (Select) | Batch recording matching: A call can be split in several legs and several recordings. Normal matching will upload only recordings belonging to the primary leg. Aggressive matching will upload recording from any leg. It is possible it will be uploaded also recording that has been stopped with a feature code. |
| Unmatched recording (Select) | Unmatched recording: What has to do with recordings not matching any call unique ID. Usually they are additional recordings generated when call are transfered and can be thrown away because they are duplicates. |
| Multi channel recording (Select) | Multi channel recording: You can record each party audio in a different file |
| Stereo recording (Select) | Stereo recording: The recording will be a stereo media file with each party in a different audio stream |
| Early recording (Select) | Early recording: The recording will include any audio before the call is bridged. |
| Process all recording legs (Select) | Process all recording legs: When enabled, all the recording legs are processed regarding email, transcript, summary and sentimental analysis. |
| Remove recordings on database expiration (Checkbox) | Remove recordings on database expiration: When the recording metadata is removed from the database, the corresponding recording file is deleted. It doesn't work retroactively. |
Media Files

Use this section to configure where shared media files are stored.
| Field or option | Purpose |
|---|---|
| Storage type (Select) | Storage type: Sets the storage backend for media files |
| Host (Select) | Host: If your FTP server is not using the standard port 21, you can configure the desired port using a host:port syntax. |
| User | Sets the User value for Media Files. |
| Password | Sets the Password value for Media Files. |
| Directory | Sets the Directory value for Media Files. |
Faxes

Use this section for fax storage and fax file retention behavior.
| Field or option | Purpose |
|---|---|
| Storage type (Select) | Storage type: Sets the storage backend for faxes |
| Host (Select) | Host: If your FTP server is not using the standard port 21, you can configure the desired port using a host:port syntax. |
| User | Sets the User value for Faxes. |
| Password | Sets the Password value for Faxes. |
| Directory | Sets the Directory value for Faxes. |
| Remove faxes on database expiration (Checkbox) | Remove faxes on database expiration: When the fax metadata is removed from the database, the corresponding fax file is deleted. It doesn't work retroactively. |
Billing

Use this section for billing dashboard visibility and billing alert delivery.
| Field or option | Purpose |
|---|---|
| Dashboard show (Select) | Selects the Dashboard show behavior for Billing. |
| Alert email | Sets the Alert email value for Billing. |
Voice Synthesizer

Use this section to configure the text-to-speech engine, voice, service endpoint, and credentials.
| Field or option | Purpose |
|---|---|
| Engine (Select) | Selects the Engine behavior for Voice Synthesizer. |
| Voice (Select) | Selects the Voice behavior for Voice Synthesizer. |
| Region (Select) | Selects the Region behavior for Voice Synthesizer. |
| Full Endpoint URL | Full endpoint URL with instance id like https://api.us-east.speech-to-text.watson.cloud.ibm.com/instances/82baccdd-45ee-46ff-ba1a-3cd23425b3c1/v1/synthesize |
| Voice Engine API username | Sets the Voice Engine API username value for Voice Synthesizer. |
| Rate/Pitch | Rate/Pitch parameters: You can control the rate and pitch of the voice to be created by entering them separated by a /, like -11/-70 |
| Voice Engine API password | Sets the Voice Engine API password value for Voice Synthesizer. |
Speech to Text
The Speech to Text section in Admin > Settings configures the global speech-recognition engine and the background jobs that process recorded calls. Tenant-level settings can override some values, but the global configuration is the fallback used by the PBX when a tenant does not define its own engine or credentials.
The screenshots below use fictional values and were captured from the global Admin Settings form without saving changes.
IBM Watson TTS

| Field | Meaning |
|---|---|
| Engine | Selects IBM Watson as the global Speech to Text provider. The historical label includes TTS, but this panel is used for recognition. |
| Full Endpoint URL | Watson recognition endpoint, including the service instance and recognize path supplied by IBM. |
| Language | Watson language and model. Choose the model that matches the spoken language and expected audio bandwidth. |
| Download Languages | Downloads or refreshes the available Watson language list after the endpoint and credentials are configured. |
| Speech To Text Engine API username | Watson credential username. Many IBM deployments use apikey as the username. |
| Speech To Text Engine API password | Watson API key or password. |
| Transcribe phone call recordings | Schedules batch transcription of recorded calls and selects the node that runs the transcript job. |
| Transcribe when recording is uploaded | Starts transcript processing immediately after a recording is uploaded, in addition to any scheduled batch processing. |
| Minimum call time for transcript | Skips recordings shorter than the configured number of seconds. |
| Test speech recognition | Uploads a WAV file and sends it to the selected engine to verify the global configuration. |
Nexiwave

| Field | Meaning |
|---|---|
| Engine | Selects Nexiwave as the global Speech to Text provider. |
| Language | Language sent to Nexiwave for recognition. |
| Speech To Text Engine API username | Nexiwave account username. |
| Speech To Text Engine API password | Nexiwave password or API secret. |
| Transcribe when recording is uploaded | When available for the selected engine, starts transcript processing immediately after recording upload. |
| Minimum call time for transcript | Skips recordings shorter than this duration. |
| Test speech recognition | Uploads a WAV file and validates the Nexiwave settings. |
Google Cloud Speech to Text

| Field | Meaning |
|---|---|
| Engine | Selects Google Cloud Speech to Text as the global recognition provider. |
| Language | Google recognition language code. Select the primary language expected in recorded calls. |
| Speech To Text Engine API password | Google API key used when audio is submitted directly without a storage bucket workflow. |
| JSON Service Account key | Service account JSON used when audio is staged in Google Cloud Storage. The service account must have access to the configured bucket. |
| Bucket Name | Google Cloud Storage bucket used to store audio before transcription. The bucket must already exist. |
| Profanity filter | Controls whether Google attempts to mask profanity in returned transcripts. |
| Transcribe phone call recordings | Schedules transcript processing for recorded calls and selects the processing node. |
| Transcribe when recording is uploaded | Starts processing immediately after recording upload. |
| Minimum call time for transcript | Prevents very short recordings from being submitted to Google. |
| Test speech recognition | Uploads a WAV file to test the Google credentials, language, and bucket/API-key configuration. |
AssemblyAI

| Field | Meaning |
|---|---|
| Engine | Selects AssemblyAI as the global Speech to Text provider. |
| Endpoint server | AssemblyAI API host. Leave empty for the default host, or set a host such as api.assemblyai.com. |
| Model | AssemblyAI model used for transcript requests. Choose the model according to accuracy and fallback requirements. |
| Keyterms Prompt | One key term per line. Use it for tenant names, product names, department names, and PBX terms that should be recognized accurately. |
| Custom Spelling | One correction per line in the form heard term:correct spelling. Use it for brand names and technical words. |
| Language | AssemblyAI language selection. Automatic detection can be used when calls are multilingual or language is not predictable. |
| Speech To Text Engine API password | AssemblyAI API token. |
| Transcribe phone call recordings | Schedules transcript processing for recorded calls and selects the processing node. |
| Transcribe when recording is uploaded | Starts processing immediately after recording upload. |
| Minimum call time for transcript | Prevents short calls from being sent to AssemblyAI. |
| Test speech recognition | Uploads a WAV file to test the AssemblyAI endpoint, model, token, and language settings. |
GeminiAI

| Field | Meaning |
|---|---|
| Engine | Selects GeminiAI for speech recognition through a generative AI model. |
| Model | Gemini model used for transcription. Choose the model according to the desired balance of speed, cost, and accuracy. |
| Model command | Instruction sent to the model for the transcription task. Leave it empty to use the default instruction, or provide global guidance such as speaker separation and PBX terminology handling. |
| Voicemail model command | Instruction sent to GeminiAI when transcribing voicemail messages. Leave it empty to use the regular model command, then the default instruction. |
| Language | Recognition language option for the GeminiAI request. |
| Speech To Text Engine API password | Gemini API key. |
| Transcribe phone call recordings | Schedules transcript processing for recorded calls and selects the processing node. |
| Transcribe when recording is uploaded | Starts processing immediately after recording upload. |
| Minimum call time for transcript | Prevents short recordings from being submitted to GeminiAI. |
| Test speech recognition | Uploads a WAV file and verifies the GeminiAI model, command, key, and language settings. |
Operational Notes
- Configure provider credentials and run a test upload before enabling automatic transcription jobs.
- Use the existing transcript processing node for scheduled jobs. Do not add a node only for documentation examples.
- External transcription services can process sensitive call audio. Review privacy, retention, billing, and data-processing requirements before enabling them globally.
- Tenant-level Speech to Text settings can override global engine, language, and credentials when a tenant requires different behavior.
Generative Artificial Intelligent chat models

Use this section to configure AI chat-model access used by summary and analysis features.
| Field or option | Purpose |
|---|---|
| Engine (Select) | Selects the Engine behavior for Generative Artificial Intelligent chat models. |
| API key | API Key to use |
| Model | Model: The model for the ChatGPT |
| Temperature | Temperature: Controls the randomness or creativity of the AI model output. Leave empty to use the provider default. |
| System content (Text area) | System content: Initialize the system content |
| Summarize user content (Text area) | Summarize user content: Provide the user content to summarize, use ${TRANSCRIPT} for the transcript |
| Voicemail summarize user content (Text area) | Voicemail summarize user content: Provide the user content to summarize voicemail messages, use ${TRANSCRIPT} for the transcript. If empty, the summarize user content is used. |
| Summarize transcribed phone call recordings (Select) | Summarize transcribed phone call recordings: Schedule the summarize for transcribed phone calls |
| Summarize when recording is transcribed (Checkbox) | Summarize when recording is transcribed: By enabling this, the summarize process will start immediately after the recording is transcribed |
| Sentimental analysis user content (Text area) | Sentimental analysis user content: Provide the user content to perform sentimental analysis, use ${TRANSCRIPT} for the transcript |
| Sentimental analyze transcribed phone call recordings (Select) | Sentimental analyze transcribed phone call recordings: Schedule the sentimental analysis for transcribed phone calls |
| Sentimental analysis when recording is transcribed (Checkbox) | Sentimental analysis when recording is transcribed: By enabling this, the sentimental analysis process will start immediately after the recording is transcribed |
Fax Protocol

Use this section for modem protocol, speed, and ECM defaults used by fax processing.
| Field or option | Purpose |
|---|---|
| Modem Type | Sets the Modem Type value for Fax Protocol. |
| Minimum Speed | Sets the Minimum Speed value for Fax Protocol. |
| Maximum Speed | Sets the Maximum Speed value for Fax Protocol. |
| Error Correction Mode (ECM) (Select) | Selects the Error Correction Mode (ECM) behavior for Fax Protocol. |
Outbound Fax Service

Use this section to control outbound fax retry behavior, protocol choices, DID filtering, and page format defaults.
| Field or option | Purpose |
|---|---|
| Rescheduling delay (minutes) | Sets the Rescheduling delay (minutes) value for Outbound Fax Service. |
| Max number of attempts | Sets the Max number of attempts value for Outbound Fax Service. |
| Force codec | Force codec: When dialing out a fax, request only the entered codec |
| Fax Protocol (Select) | Selects the Fax Protocol behavior for Outbound Fax Service. |
| Show only Fax DIDs (Select) | Selects the Show only Fax DIDs behavior for Outbound Fax Service. |
| Fast OnNet Fax processing (Select) | Fast OnNet Fax processing: When a fax is directed to an onnet number, just copy the fax to the destination, without really sending it |
| Default page format (Select) | Default page format: When a fax is sent and no page format is selected, this one is used |
Inbound Fax Service

Use this section for inbound fax sender identity, detection timing, and generated fax file names.
| Field or option | Purpose |
|---|---|
| Sender Email name | Sender Email name: If no template is defined for the inbound fax service email, this sender email name will be used |
| Sender Email address | Sender Email address: If no template is defined for the inbound fax service email, this sender email address will be used |
| Automatic fax detection time | Number of seconds to wait for remote fax tone when DID set to autodetect faxes. It adds a delay in reception of calls when DID set to autodetect faxes. |
| Fax file name format (Select) | When delivering the fax by email, a different file name format can be used |
Mail to Fax Service

Use this section for network timeout and automatic disable behavior for mail-to-fax processing.
| Field or option | Purpose |
|---|---|
| Network activity timeout | Network activity timeout: Mailboxes are checked serially, this will set the amount of time to wait for any network I/O operation, in seconds |
| Automatic disable after X failures | Automatic disable after X failures: After configured failures, automatic disable the mailbox, use 0 to disable the feature |
Mail to Call Service

Use this section for network timeout and automatic disable behavior for mail-to-call processing.
| Field or option | Purpose |
|---|---|
| Network activity timeout | Network activity timeout: Mailboxes are checked serially, this will set the amount of time to wait for any network I/O operation, in seconds |
| Automatic disable after X failures | Automatic disable after X failures: After configured failures, automatic disable the mailbox, use 0 to disable the feature |
User Authentication - LDAP

Use this section to configure LDAP binding and test credentials for external authentication.
| Field or option | Purpose |
|---|---|
| Base DN | Base DN: The base DN, like ou=users,dc=company,dc=local |
| Account Suffix | Account Suffix: Like ou=sysops |
| Account Prefix | Account Prefix: Like cn= |
| Domain Controllers | Domain Controlles: List the domain controllers including the protocol, like ldap://dc1.company.com,ldap://dc2.company.com |
| Test Username | Test Username: The username will be joined in a string like {Account Prefix}{Username},{Account Suffix},{Base DN} |
| Test Password | Sets the Test Password value for User Authentication - LDAP. |
Conferencing

Use this section for conference email sender defaults.
| Field or option | Purpose |
|---|---|
| Sender Email name | Sets the Sender Email name value for Conferencing. |
| Sender Email address | Sets the Sender Email address value for Conferencing. |
Voicemail

Use this section for voicemail audio format visibility and defaults.
| Field or option | Purpose |
|---|---|
| Audio format configured (Select) | Audio format configured: Set to the audio format chosen in /etc/asterisk/voicemail.conf. This is not for choosing the voicemail audio format, but to make the web interface use the same audio format chosen in the voicemail configuration file. |
Voicemail backup

Use this section to configure backup storage for voicemail messages.
| Field or option | Purpose |
|---|---|
| Storage type (Select) | Storage type: Sets the storage backend for voicemail backup. There is no data retention limit. |
| Host (Select) | Host: If your FTP server is not using the standard port 21, you can configure the desired port using a host:port syntax. |
| User | Sets the User value for Voicemail backup. |
| Password | Sets the Password value for Voicemail backup. |
| Directory | Sets the Directory value for Voicemail backup. |
| Voicemail recording name (Select) | Voicemail recording name: You can choose the name of the recording. |
Provisioning

Use this section for provisioning host, blocked provisioning files, and fast-provisioning QR code format.
| Field or option | Purpose |
|---|---|
| Provisioning host name | Provisioning host name: Set the provisioning host name reported in the Configuration/Provisioning/Phones page. If left blank will automatically use the one defined in the theme selected, in the tenant or the host name used to access the web interface. |
| Blacklisted autoprovisioning files (Text area) | Blacklisted autoprovisioning files: If a file matches one of these regex, then the usual MAC matching is disabled and only a custom file can be served, if available |
| Fast provisioning QR Code | Fast provisioning QR Code: If enabled in the tenant, create a QR Code in the Configuration/Extensions page to provision the extension on supporting softphones. You can use the following variables: $username, $secret, $macaddress, $password, $http_user and $http_password |
Inbound Unassigned DIDs

Use this section for alerting and media playback when an inbound DID is not assigned.
| Field or option | Purpose |
|---|---|
| Alert Email address | Sets the Alert Email address value for Inbound Unassigned DIDs. |
| Media file to play | Sets the Media file to play value for Inbound Unassigned DIDs. |
Disabled Tenants

Use this section for the media played when disabled tenants receive or place calls.
| Field or option | Purpose |
|---|---|
| Inbound calls file to play | Sets the Inbound calls file to play value for Disabled Tenants. |
| Outbound calls file to play | Sets the Outbound calls file to play value for Disabled Tenants. |
CSV Exports

Use this section for CSV delimiter, enclosure, escape, and BOM defaults.
| Field or option | Purpose |
|---|---|
| Delimiter | Sets the Delimiter value for CSV Exports. |
| Enclosure | Sets the Enclosure value for CSV Exports. |
| Escape char | Sets the Escape char value for CSV Exports. |
| BOM sequence (Select) | Selects the BOM sequence behavior for CSV Exports. |
Inbound calls

Use this section for inbound privacy defaults.
| Field or option | Purpose |
|---|---|
| Privacy (Select) | Selects the Privacy behavior for Inbound calls. |
Outbound calls

Use this section for busy or blocked-call media, minimum call time, and failed-call reporting.
| Field or option | Purpose |
|---|---|
| On Busy - media file to play | Sets the On Busy - media file to play value for Outbound calls. |
| On Do Not Call list - media file to play | Sets the On Do Not Call list - media file to play value for Outbound calls. |
| Minimum call time in seconds | Minimum call time in second: Enter the minimum call time, in seconds, otherwise the call will be not even started |
| Failed call reported as (Select) | Failed call reported as: When a call is unroutable or all providers fail to connect, report as |
CNAM service

Use this section to configure caller-name lookup, caching, and UTF-8 handling.
| Field or option | Purpose |
|---|---|
| URL/custom AGI script | URL: Enter the CNAM URL using %%NUM%% as placeholder for the number of phone. Or the name of an agi script returning the CNAM value As example for OpenCNAM: https://api.opencnam.com/v2/phone/%%NUM%%?format=pbx&account_sid=ACCOUNT_SID&auth_token=AUTH_TOKEN replacing ACCOUNT_SID and AUTH_TOKEN with the one provided by OpenCNAM |
| Request only when CallerID name is empty (Checkbox) | Enables or disables Request only when CallerID name is empty. |
| Allow UTF-8 characters and symbols (Checkbox) | Enables or disables Allow UTF-8 characters and symbols. |
| Caching (Checkbox) | Enables or disables Caching. |
| Cache retention (days) | Sets the Cache retention (days) value for CNAM service. |
| Manage CNAM Cache (Action) | Opens or runs the related administration action. |
Switchboard

Use this section for switchboard websocket connection defaults.
| Field or option | Purpose |
|---|---|
| Websocket hostname:port to connect | Websocket hostname:port to connect: This is the fully qualified domain name of server running the AMI Router |
| SSL Usage (Select) | SSL usage: Here you define if the client javascript application will talk to the host using SSL or not. |
WebRTC

Use this section for WebRTC SIP servers, realms, websocket proxies, and softphone user-agent settings.
| Field or option | Purpose |
|---|---|
| Chan_sip WebRTC SIP server | Chan_sip WebRTC server: When authenticating with a chan_sip account, this server will be used for the WebRTC SIP phone. |
| PJSIP WebRTC SIP server | PJSIP WebRTC server: When authenticating with a PJSIP account, this server will be used for the WebRTC SIP phone. |
| Chan_sip realm for registration | Chan_sip realm for registration: Server realm to be used by the switchboard extensions to register using chan_sip. |
| PJSIP realm for registration | PJSIP realm for registration: Server realm to be used by the switchboard extensions to register using PJSIP. |
| Websocket proxy URL for chan_sip | Websocket proxy URL for chan_sip: This is the websocket proxy URL to use for switchboard extensions to register when using chan_sip. |
| Websocket proxy URL for PJSIP | Websocket proxy URL for PJSIP: This is the websocket proxy URL to use for switchboard extensions to register when using PJSIP. |
| Softphone user agent | Softphone user agent: The user agent to report to the system. |
SMS

Use this section for SMS DID filtering and SMS length limits.
| Field or option | Purpose |
|---|---|
| Show CallerID DIDs for SMS (Select) | Show CallerID DIDs for SMS: Permit to Show only DIDs configured to receive SMS |
| Max SMS length | Max SMS length: Enter the max number of character accepted for an SMS in the portal |
Security

Use this section for password visibility, password policy, reCAPTCHA, two-factor authentication, custom extension usernames, web username uniqueness, and session-cookie hardening.
| Field or option | Purpose |
|---|---|
| Hide Password in main screens (Checkbox) | Enables or disables Hide Password in main screens. |
| Allow to show hidden Password in main screens (Checkbox) | Enables or disables Allow to show hidden Password in main screens. |
| Use split cost limits (domestic/international) (Checkbox) | Enables or disables Use split cost limits (domestic/international). |
| WebRTC SSL path | WebRTC SSL path: Enter the full path, usually /etc/asterisk/certificates/yourdomain.pem to allow WebRTC clients. You need to reload the sip module or prune the clients when this is updated |
| Change password enforcement regex | Change password enforcement regex: Enter the regex to use for passwords entered by the user in the Login/Change Password |
| Change password enforcement message | Change password enforcement message: Enter the message to use when the passwords entered by the user in the Login/Change Password doesn't meet the required regex |
| Special characters in auto generated passwords | Special characters in auto generated passwords: List of special characters used in the auto generation of passwords. Some softphones or provisioning templates can't use any character |
| System password expiration days | System password expiration days: Request a password change for system users after defined days since last change. Leave blank to disable password expiration. |
| Use Google reCAPTCHA (Select) | SSL usage: Use Google reCAPTCHA |
| reCAPTCHA site key | reCAPTCHA site key: You need to register on google.com and obtain a reCAPTCHA API key for your list of domains |
| reCAPTCHA secret key | reCAPTCHA secret key: You need to register on google.com and obtain a reCAPTCHA API key for your list of domains |
| 2FA tenant for SMS sending (Select) | Selects the 2FA tenant for SMS sending behavior for Security. |
| 2FA SMS message | 2FA SMS message: This is the message delivering the code for 2FA authentication, use %%CODE%% for replace the actual code |
| 2FA SMS callerid | 2FA SMS callerid: This is the callerid to use when delivering the code for 2FA authentication |
| Allow extensions with custom usernames (Checkbox) | Allow extensions with custom usernames: Allow to create extensions with custom usernames. |
| Requires unique Web usernames (Checkbox) | Require unique Web usernames: Requires extension web usernames to be unique among all the tenants. |
| Increased Session Cookies security (Checkbox) | Increased Session Cookies security: Activate several restriction on the session cookie usage to increase security. |
Logging

Use this section for extension event logging, provisioning activity logging, device-state logging, latency logging, and PHP error reporting.
| Field or option | Purpose |
|---|---|
| Log Extension Events (Checkbox) | Log Extension Events: Log any change in the extension state, you can review these logs from Status/Peers |
| Log Provision Activities (Checkbox) | Log Provision Activities: Log any provision request from phones |
| Device state pedantic commit (Checkbox) | Device state pedantic commit: Rewrite the state of extension at every registration, even if the state has not changed |
| Device state logging (Checkbox) | Device state logging: Log any devstate activity using syslog |
| Monitor DID for BLF (Checkbox) | Monitor DID for BLF: Monitor any DID state for BLF |
| PHP Error reporting (Checkbox) | PHP Error reporting: Show all the bad PHP coding, warnings and errors. You don't need it. |
Music On Hold

Use this section for default music-on-hold selection and streaming mode.
| Field or option | Purpose |
|---|---|
| Default Music On Hold (Select) | Selects the Default Music On Hold behavior for Music On Hold. |
| Default Music On Hold streaming engine (Select) | Selects the Default Music On Hold streaming engine behavior for Music On Hold. |
| Music On Hold mode (Select) | Selects the Music On Hold mode behavior for Music On Hold. |
Stats

Use this section for statistics calculation behavior.
| Field or option | Purpose |
|---|---|
| Count transfer as answered (Select) | Agent Activity: Count transferred calls, even parked, as answered calls. |
MS Teams integration

Use this section for Microsoft Teams integration and OpenSIPS connectivity.
| Field or option | Purpose |
|---|---|
| MS Teams integration (Select) | MS Teams integration: Enable the MS Teams integration. You need to define the MS Teams address in the Admin/Tenant |
| OpenSIPS socket | OpenSIPS socket: Something like tls:__ip_address__:5067 where the OpenSIPS is listening |
| OpenSIPS server connection (Select) | OpenSIPS server connection: The server who has the connection to the OpenSIPS server |
QueueMetrics API

Use this section for QueueMetrics integration behavior.
| Field or option | Purpose |
|---|---|
| QueueMetrics API (Select) | QueueMetrics API: Enable the QueueMetrics API by sending to QueueMetrics the logs from the selected queues |
| QueueMetrics delay | QueueMetrics delay: How many milliseconds to wait between two API calls to QueueMetrics |
Theming

Use this section for theme-related certificate and virtual-host defaults.
| Field or option | Purpose |
|---|---|
| Let's Encrypt certificates creation from Admin/Themes page (Checkbox) | Let's Encrypt certificates creation from Admin/Themes page: Allow the system to automatically generate and optionally renew Let's Encrypt certificates |
| Virtual Host directory | Virtual Host directory: Allow the system to automatically generate virtual host configurations. Usually it is /etc/httpd/conf.d |
| Virtualhost Template (Text area) | Sets the Virtualhost Template value for Theming. |
Queue History Theming

Use this section for queue-history filtering behavior.
| Field or option | Purpose |
|---|---|
| Queue History easy filters (Select) | Queue History easy filters: In Status/Queue History show easy filters like in Status/Stats. |
Dashboard Theming

Use this section for dashboard chart defaults.
| Field or option | Purpose |
|---|---|
| Call quantity most recent day (Select) | Call quantity most recent day: Most recent day to show in the Call Quantity tab. |
Call History Theming

Use this section for call-history display, filtering, row loading, and preprocessing behavior.
| Field or option | Purpose |
|---|---|
| Call History view (Select) | Call History view: In Status/Call History controls if to show all legs or try to show compact by grouping them. |
| Call History easy filters (Select) | Call History easy filters: In Status/Call History show easy filters like in Status/Stats. |
| Call History mobile view (Select) | Call History mobile view: In Status/Call History show a mobile phone optimized view when using a smartphone |
| Call History destination view (Select) | Call History destination view: In Status/Call History controls how to display the destination number dialed. |
| Call History row count (Select) | Call History row count: Counting every row in the Call History is slow and most of the time, useless. Using this option you can speed up the counting of rows |
| Call History number of rows preloaded | Call History number of rows preloaded: Specifies how many rows to preload when loading the Call History |
| Call History wherelanded preprocessing (Select) | Call history wherelanded preprocessing: Accessing the call history can be slow because the system needs to compute each call real destination. You can schedule a preprocessing to speed up access to Call history |
Advanced Customization

Use this section for advanced UI, DID format, tenant visibility, SIP Diversion header host handling, SIP stack, cron server, language, and low-level routing defaults.
| Field or option | Purpose |
|---|---|
| Show status of extension in Configuration/Extensions page (Checkbox) | Enables or disables Show status of extension in Configuration/Extensions page. |
| Show status of extension in Status/Peers page (Checkbox) | Enables or disables Show status of extension in Status/Peers page. |
| DID Format (Select) | Selects the DID Format behavior for Advanced Customization. |
| National form in DID select (Checkbox) | Enables or disables National form in DID select. |
| National form with no trunk in DID select (Checkbox) | Enables or disables National form with no trunk in DID select. |
| E.164 form in DID select (Checkbox) | Enables or disables E.164 form in DID select. |
| E.164 with plus in DID select (Checkbox) | Enables or disables E.164 with plus in DID select. |
| E.164 with international prefix in DID select (Checkbox) | Enables or disables E.164 with international prefix in DID select. |
| Show + in DID numbers (Checkbox) | Enables or disables Show + in DID numbers. |
| Ignores digits after # or ; (Checkbox) | Enables or disables Ignores digits after # or ;. |
| Admins see all tenants (Checkbox) | Enables or disables Admins see all tenants. |
| Use advanced filters (Checkbox) | Enables or disables Use advanced filters. |
| Use filter toolbar (Checkbox) | Enables or disables Use filter toolbar. |
| Use DIDs storage (Checkbox) | Enables or disables Use DIDs storage. |
| Use translations (Checkbox) | Enables or disables Use translations. |
| Use branches and departments (Checkbox) | Enables or disables Use branches and departments. |
| Alert on NAT IP/port duplicate (Checkbox) | Enables or disables Alert on NAT IP/port duplicate. |
| Permit HTTP usage (Checkbox) | Enables or disables Permit HTTP usage. |
| Kill MOH process after 60 minutes (Checkbox) | Enables or disables Kill MOH process after 60 minutes. |
| SIP Trunk Module (Select) | SIP Trunk Module: Use the defined asterisk module when passing the call from one server to the other |
| Diversion Host | Diversion Host: Host to use in SIP Diversion headers. Leave empty to use the system name. |
| Session duration | Session duration is read from php.ini, but it can be set here (in seconds). 1 hour are 3600 seconds. |
| Lock facilities (queue, parking lots and conference rooms) to the assigned server (Checkbox) | Lock facilityies: When defining a queue, a conference room or a parking lot, you need to assign them to one of your servers. If left to be assigned automatically, they will be run from the first server trying to use it. They will be moved to another server when the server where they are assigned will stop answering. You can lock them to one server, so they will not be reassigned to another server if the server running them will be temporarily not answering. |
| Queue Stats Reset (Select) | Queue Stats Reset: Reset the Asterisk mantained stats like SLA and SLA2 at midnight. |
| jqGrid tenant selection (Select) | Selects the jqGrid tenant selection behavior for Advanced Customization. |
| SIP stack available (Select) | Selects the SIP stack available behavior for Advanced Customization. |
| Preferred SIP stack (Select) | Selects the Preferred SIP stack behavior for Advanced Customization. |
| First day in date and time picker (Select) | Selects the First day in date and time picker behavior for Advanced Customization. |
| LCR Prefix for expansion | Sets the LCR Prefix for expansion value for Advanced Customization. |
| MAX TTL for calls | MAX TTL for calls: A call can trigger several destinations, each destination can trigger several other destinations. To avoid loops or infinite running calls, a maximal number of steps can be set for any call. By default it is 100. |
| MAX TTL alert Email | MAX TTL alert Email: When a TTL expires it can be due to a loop. A loop is dangerous because it uses lots of CPU power. You can be noticed when it happens. |
| Tenant Selector Format (Select) | Selects the Tenant Selector Format behavior for Advanced Customization. |
| Default cronjob server (Select) | Selects the Default cronjob server behavior for Advanced Customization. |
| Default campaign server (Select) | Selects the Default campaign server behavior for Advanced Customization. |
| Default SMS server (Select) | Selects the Default SMS server behavior for Advanced Customization. |
| Campaign "fast start" delay | Campaign fast start delay: Campaigns to be started are checked every minute. This means, when starting a campaign using a feature code, it can take up to 60 seconds before it really starts. You can configure here a delay in seconds, activating a more fine check for campaign start. Setting to empty, will stop the fast start feature. |
| Default fax server (Select) | Selects the Default fax server behavior for Advanced Customization. |
| Available Languages | Sets the Available Languages value for Advanced Customization. |
| Custom peer status page query | Custom peer status page query: You can provide a query to be executed for each of the peers in peer status, returning a list of fields. Use %%PEERNAME%% for the peer name, like select mailbox as Mailbox,allow as Allow from sipfriends where data-inputname= |
| Save, Save (Action) | Opens or runs the related administration action. |
Administration Links

Use this side panel to open related global administration tools.
| Field or option | Purpose |
|---|---|
| Languages (Action) | Opens the related global administration page. |
| Codecs (Action) | Opens the related global administration page. |
| Date and time formats (Action) | Opens the related global administration page. |
| Ring tones (Action) | Opens the related global administration page. |
| Regions (Action) | Opens the related global administration page. |
| Backups (Action) | Opens the related global administration page. |
| Auto Answers (Action) | Opens the related global administration page. |
| Digital Faxes (Action) | Opens the related global administration page. |
| Default Quick shortcuts (Action) | Opens the related global administration page. |
| Push Notifications (Action) | Opens the related global administration page. |
| System Messages (Action) | Opens the related global administration page. |
| SIP Cause Codes (Action) | Opens the related global administration page. |
Upgrade and Version
Use this area to check the installed software version, available versions, database schema version, and controlled upgrade or reinstall actions.
Dialing and Internationalization
Configure currency, international prefix, trunk prefix, country code, language, DID matching, caller ID enforcement, and outbound digit restrictions.
Security and Access
Configure global access, API behavior, password rules, tenant visibility, SIP scanner protection, and security-related defaults.